When we were younger, when my mom had prepared an especially delicious meal, my dad would call across the dinner table "how about a round of snaps for mom", and we Steagall kids would raise our knubby fingers into the air, and awkwardly snap our way toward something that resembled a compliment to my mother's skill in the kitchen. We snapped a lot in our youth. It's a wonder that one of us didn't end up on America's Got Talent, snapping our way to fame, like Bobby Badfingers.
I'd like to continue the Steagall Family snapping tradition by calling for a round of snaps for Molly, over at Orangette. Her blog has been one of my favorite since day one, and I have made more recipes that she's posted about than from any other blog. They've all been wonderful - and I made another one of her creations for my lunch today, and it solidified what many bloggers out there know - Molly rocks.
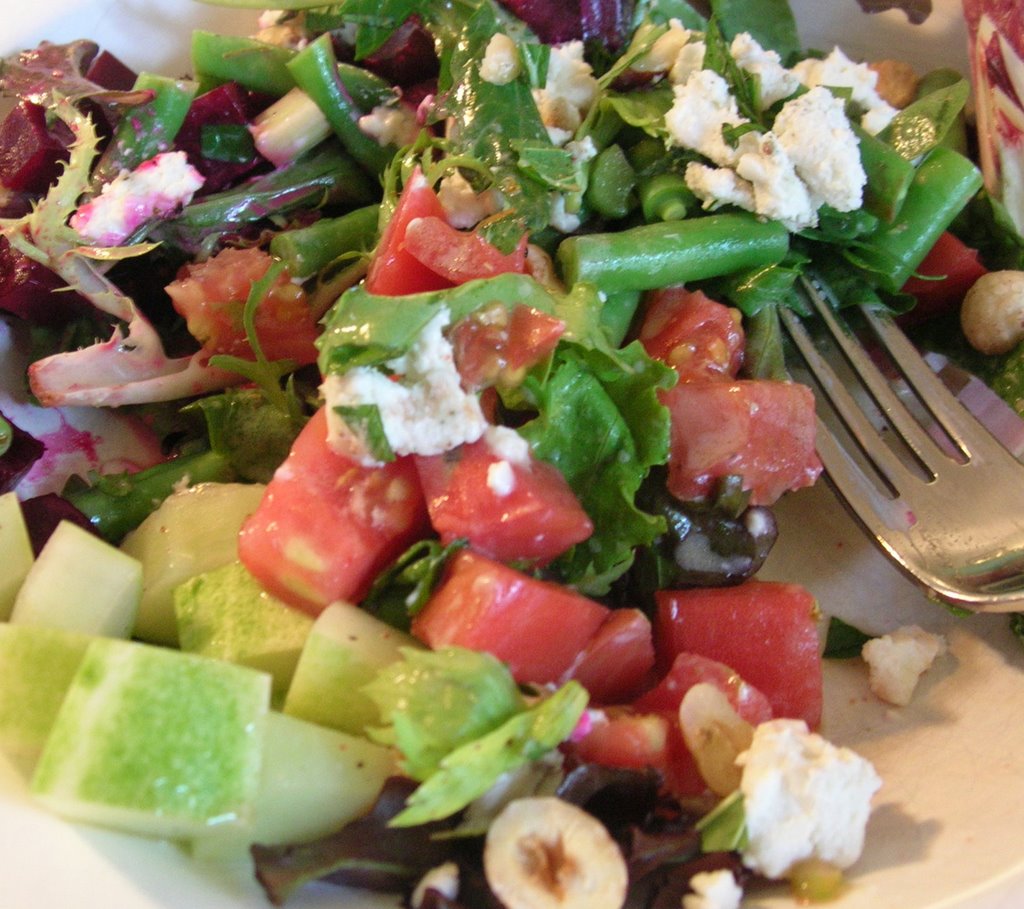
I was dying to take a picture of this salad, because it's totally gorgeous (I was literallly gushing as I was making it), but I want to leave the glory to Molly, since it is the product of her creativity in the kitchen. Please go check this salad out, and then make it - immediately. It is different and so delicious.
Friday, July 28
Thursday, July 27
Chop Chop
A chopped salad is hardly ever inspiring. It can be tasty at times, there's no doubt, but as far as salads go, it's sort of a non-salad-eaters salad. It's barely healthy, and is usually made of limp and processed meats and cheeses, which brings it closer in classification to a hoagie than a salad.
I've made a recent resolution to fill my life with salads - new salads, full of ingredients I don't often eat, like beets, endive, or radicchio - topped with different cheeses, and exciting new dressings. So far, this resolution has been easier to keep than most - summer just begs for quick meals that leave you feeling light and refreshed. I've been on a goat cheese bender recently too, so most of my salads end up with a good bit of creamy cheese sprinkled over the top, which makes any salad worth eating.

So, in the spirit of my new resolution, a few nights ago, I made the Chopped Salad with Beets, Beans, Hazelnuts and Goat Cheese, out of last month's Food and Wine. The recipe appeared in a wonderful article called "The Feel-Good Kitchen", about a restaurant in Boulder, Colorado, called, not surprisingly, "The Kitchen". I must mention that I read this article about 3 times, in some sort of effort to transport myself back to my former stomping grounds. I lived in Boulder for 5 years during college, and leaving that beautiful "bubble" has left me aching for it ever since. I love where I am, and Dustin and I's life in North Carolina, but I have a special place in my heart for Colorado, and the West in general. I miss it terribly.
In homage to that town that I loved so dearly, I prepared the ingredients for this salad with extra attention - lining them up on my cutting board in neat little piles, and stopping to admire their beauty along the way. The salad was a deliciously different take on the Chop Salad we all know. Far more sophisticated, with it's tangy goat cheese, earthy beets, and crunchy hazelnuts. The dressing is light and slightly sweet from the honey, and makes a nice pairing with the straightforward taste of all those wonderful veggies. And as a bonus, the leftover dressing at the bottom of the bowl is the most beautiful pink color - Dustin and I had it all over the ends of our noses as we slurped out every last drop.
Chopped Salad with Beets, Beans, Hazelnuts, and Goat Cheese
Food and Wine, "The Feel-Good Kitchen", from The Kitchen
1 large beet (6 ounces), quartered
1/4 cup skinned hazelnuts
1/4 pound green beans
2 tablespoons plain low-fat yogurt
1 1/2 tablespoons fresh lemon juice
1 teaspoon honey
2 tablespoons extra-virgin olive oil
Salt and freshly ground pepper
1/2 pound mixed salad greens, such as baby romaine, butter lettuce, radicchio and endives, coarsely chopped
1 carrot, finely diced (substituted cucumber, since I was out of carrot)
1 celery rib, finely diced
1 plum tomato, seeded and chopped
1 tablespoon chopped mint leaves
2 1/2 ounces soft, fresh goat cheese, crumbled
Preheat the oven to 375°. Place the beet in a small baking dish with 1/4 cup of water. Cover with foil and roast the beet for 45 minutes, until tender. Let cool slightly, then peel and finely dice.
In the meantime, spread the hazelnuts in a pie plate and toast them for about 10 minutes, until they are golden. Let cool, then coarsely chop the nuts.
Blanch the green beans until crisp-tender, about 5 minutes. Drain and cool under running water. Pat the beans dry and cut into 1-inch pieces.
In a large bowl, whisk the yogurt with the lemon juice, honey and olive oil and season the dressing with salt and pepper. Add the diced beet, hazelnuts, green beans, salad greens, carrot, celery, tomato, mint and goat cheese and toss gently. Serve the salad right away.
Serves 4 - 6

I've made a recent resolution to fill my life with salads - new salads, full of ingredients I don't often eat, like beets, endive, or radicchio - topped with different cheeses, and exciting new dressings. So far, this resolution has been easier to keep than most - summer just begs for quick meals that leave you feeling light and refreshed. I've been on a goat cheese bender recently too, so most of my salads end up with a good bit of creamy cheese sprinkled over the top, which makes any salad worth eating.
So, in the spirit of my new resolution, a few nights ago, I made the Chopped Salad with Beets, Beans, Hazelnuts and Goat Cheese, out of last month's Food and Wine. The recipe appeared in a wonderful article called "The Feel-Good Kitchen", about a restaurant in Boulder, Colorado, called, not surprisingly, "The Kitchen". I must mention that I read this article about 3 times, in some sort of effort to transport myself back to my former stomping grounds. I lived in Boulder for 5 years during college, and leaving that beautiful "bubble" has left me aching for it ever since. I love where I am, and Dustin and I's life in North Carolina, but I have a special place in my heart for Colorado, and the West in general. I miss it terribly.
In homage to that town that I loved so dearly, I prepared the ingredients for this salad with extra attention - lining them up on my cutting board in neat little piles, and stopping to admire their beauty along the way. The salad was a deliciously different take on the Chop Salad we all know. Far more sophisticated, with it's tangy goat cheese, earthy beets, and crunchy hazelnuts. The dressing is light and slightly sweet from the honey, and makes a nice pairing with the straightforward taste of all those wonderful veggies. And as a bonus, the leftover dressing at the bottom of the bowl is the most beautiful pink color - Dustin and I had it all over the ends of our noses as we slurped out every last drop.
Chopped Salad with Beets, Beans, Hazelnuts, and Goat Cheese
Food and Wine, "The Feel-Good Kitchen", from The Kitchen
1 large beet (6 ounces), quartered
1/4 cup skinned hazelnuts
1/4 pound green beans
2 tablespoons plain low-fat yogurt
1 1/2 tablespoons fresh lemon juice
1 teaspoon honey
2 tablespoons extra-virgin olive oil
Salt and freshly ground pepper
1/2 pound mixed salad greens, such as baby romaine, butter lettuce, radicchio and endives, coarsely chopped
1 carrot, finely diced (substituted cucumber, since I was out of carrot)
1 celery rib, finely diced
1 plum tomato, seeded and chopped
1 tablespoon chopped mint leaves
2 1/2 ounces soft, fresh goat cheese, crumbled
Preheat the oven to 375°. Place the beet in a small baking dish with 1/4 cup of water. Cover with foil and roast the beet for 45 minutes, until tender. Let cool slightly, then peel and finely dice.
In the meantime, spread the hazelnuts in a pie plate and toast them for about 10 minutes, until they are golden. Let cool, then coarsely chop the nuts.
Blanch the green beans until crisp-tender, about 5 minutes. Drain and cool under running water. Pat the beans dry and cut into 1-inch pieces.
In a large bowl, whisk the yogurt with the lemon juice, honey and olive oil and season the dressing with salt and pepper. Add the diced beet, hazelnuts, green beans, salad greens, carrot, celery, tomato, mint and goat cheese and toss gently. Serve the salad right away.
Serves 4 - 6

Monday, July 24
Watermelon Red Onion Relish
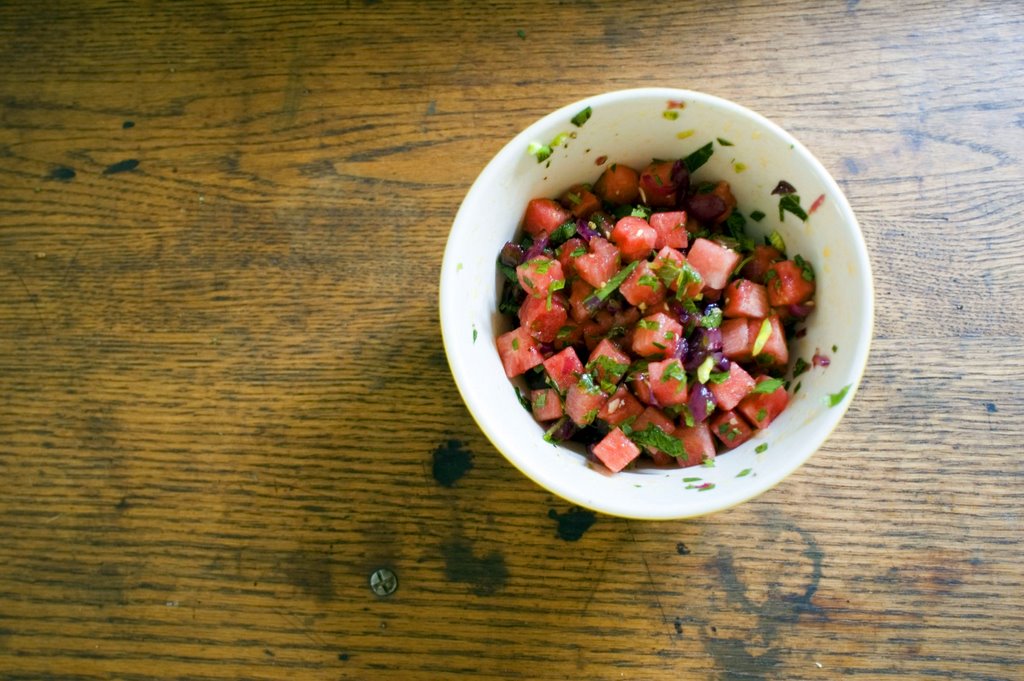
I've noticed recently how often watermelon appears, somewhat surprisingly, in a diverse and enticing range of recipes, such as a salad with feta and mint, a gazpacho-style soup, curried crab and watermelon salad, or even a parfait with watermelon and mascarpone.
In the past, I remained curiously ambivilant each time one of these recipes passed before my eyes. Perhaps I was convinced that the watermelon would surely turn mushy, or that the crisp sweet taste of watermelon was better kept for enjoying on the front porch, bent over towards my toes, so that the juices run anywhere but all over the front of my shirt. Whatever the reason, I've overcome my bias, and have tried my hand at my very first watermelon recipe. I'm happy to report that I'll be rushing to try more recipes featuring this ruby-colored, oh-so-crunchy and refreshing summertime favorite.
Last year I ordered the book Frank Stitt's Southern Table, which I immediately fell in love with. This book is gorgeous, and Frank tells a story that transports you to his world of Southern hospitality, full of colorful characters and wonderfully fresh produce, and leaves you almost ready to hop in your car and head down to Birmingham, Alabama. I can just imagine sitting at the beautiful bar at Highlands Bar and Grill, and ordering a watermelon martini, while Dustin and I wait for our white-linen table, set for two.
Despite my apparent love-affair with the book, which I've read a half-dozen times, I'd never made anything from it until recently. If I am guilty of tardiness, at least I'm not guilty of choosing poorly......I'd had my eye on the Skirt Steak with Watermelon and Red Onion Relish, which we made a few nights ago, and it was killer. The combination of the juicy skirt steak, marinated in lime juice, garlic, and tons of parsley, was a delicious contrast to the cold, spicy watermelon relish. It was easy, and it was wonderful. Here's the relish recipe, which I altered only by decreasing the amount of olive oil by half - I didn't think it needed it. The recipe says it serves 4-6, but Dustin and I killed the entire recipe ourselves.
Watermelon and Red Onion Relish
Adapted from Frank Stitt's Southern Table
Serves 2 - 4
1 medium red onion, thickly sliced
1 cup cubed watermelon (about 1/2 inch cubes), chilled
2 tablespoons extra-virgin olive oil (I used 1 tablespoon)
1 tablespoon champagne vinegar
1 tablespoon chopped mint or chives (or more, to taste)
1 tablespoon chopped flat-leaf parsley (or more, to taste)
1 teaspoon finely minced jalapeno, with seeds
Kosher salt and fresh ground black pepper
Prepare a hot grill or preheat the broiler. Grill or broil the onion slices for 3-4 minutes per side, or until evenly charred. Chop the onion into 1/4 inch pieces.
In a large bowl, combine the watermelon, onion, olive oil, vinegar, herbs, jalapeno, salt and pepper. Toss, taste, and adjust the seasoning as needed. Cover and refrigerate until chilled
Serve cold, straight from the refrigerator, for a wonderful crunchy contrast to tender meat hot off the grill.
When the Garden Runneth Over
I never had any experience with gardening until Dustin and I planted our first garden together two years ago. I was woefully uneducated in the art of growing anything, and Dustin chuckled to himself when I came home with 8 tomato plants, 8 cucumber plants, and 8 zucchini plants, which I planted in a row, all about 4 inches apart from each other. How was I supposed to know that plants get big...I mean really big? So, I learned my lesson that first year, when our little raised garden looked like a miniature jungle. And yet despite my folly, we had a big and bountiful harvest, and our gardening endeavors and aspirations have grown each year since then. I will never go another year in my life without planting a garden, for there is nothing better in the summer than walking into your backyard, and returning to the house with an armload of what will become your dinner.
I knew we were going to be bombarded with more zucchini than we could handle, so I started planning early which recipes I most wanted to try once the harvest was upon us. I made a handful of dishes, both sweet and savory during the past month, all starring zucchini. Our favorite savory dish was the Pappardelle with Zucchini and Mint Parsley Pesto, from this month's Food and Wine. With long strips of zucchini, chewy pappardelle, and the bright taste of the pesto, full of the clean and refreshing flavors of mint and parsley, this dish was simple and satisfying, and wonderful alongside a nice cold glass of white wine.
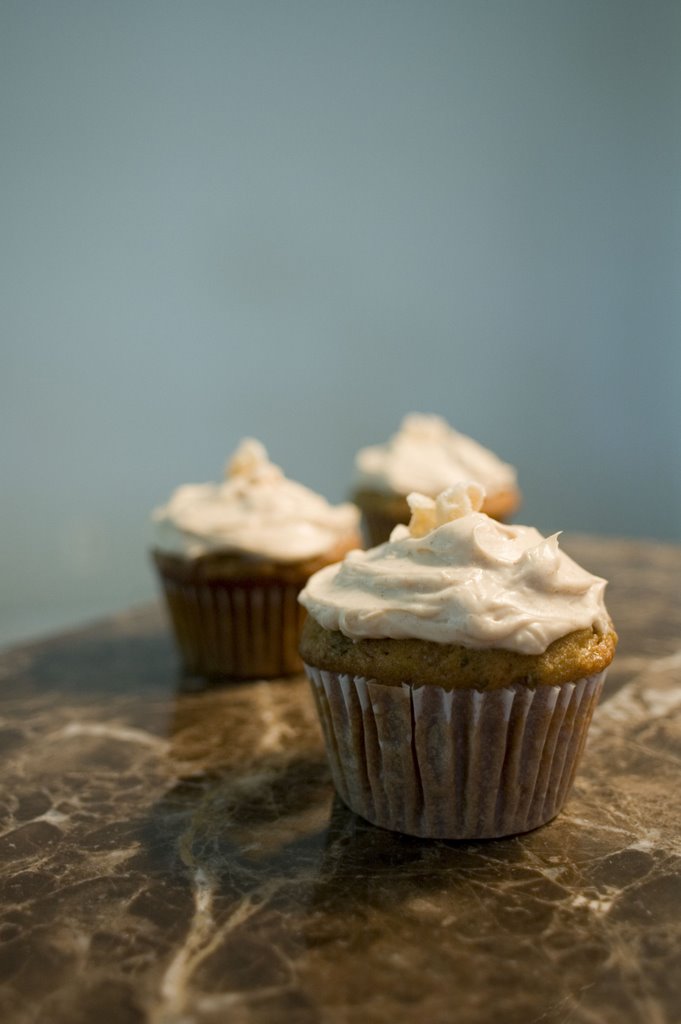
 And our favorite sweet dish? Zucchini and Ginger Cupcakes from Gourmet last month. The recipe was just different enough, that I couldn't resist trying it. Most zucchini and loaf cakes, for that matter, contain somewhat shocking amounts of sugar and oil, so when I read that this recipe used olive oil, and honey for the sweetener, I was intrigued. I knew the honey would contribute an incredible amount of moisture, which it did, and the olive oil was indiscernable as a flavor, but I loved using it instead of corn or canola oil. The cakes are delicate, and just lightly sweet, which was a welcome contrast to the absolutely delicious cream cheese frosting. The frosting was made of mostly cream cheese, with a few tablespoons of butter, and a relatively small amount of powdered sugar. I loved the addition of cinnamon and ground ginger, which gave the frosting a speckled and golden appearance, and added an interesting and somewhat sophisticated note to the cupcake.
I made a few changes to the recipe, like using 25% whole wheat flour, and using Neufetchal instead of full-fat cream cheese. I also only had extra-virgin olive oil in the pantry, so I used that, and found no issue with the flavor. I had also forgotten to pick up an orange at the store, so I used a little orange juice instead in the frosting, and I used some candied orange peel in the cakes, but next time I will definitely use the orange zest both in the cupcake and in the frosting, because I always love the addition of orange zest, and I think it would add a welcome "high note" in the flavors. I also garnished with some candied ginger, which the recipe doesn't call for, but which they show in the picture. I also happen to love raisins, so next time I make these, I will throw some rum-soaked raisins in the batter....because there will definitely be a next time!

Zucchini Ginger Cupcakes
Gourmet Magazine, Fresh from the Farm, July 2006
Cupcakes:
1/3 cup crystallized ginger (1 3/4 oz), coarsely chopped
2 cups all-purpose flour (or substitute 1/2 cup whole wheat)
1 teaspoon groung ginger
1 teaspoon ground cinnamon
1 teaspoon finely grated orange zest
1 teaspoon salt
1 teaspoon baking soda
1/2 teaspoon baking powder
2 cups grated zucchini
3/4 cup mild olive oil
3/4 cup mild honey
2 large eggs, lightly beaten
1 teaspoon vanilla
Frosting:
8 oz cream cheese or neufetchal
2 tablespoons unsalted butter, softened
1/2 cup confectioner's sugar
1 teaspoon vanilla
1/2 teaspoon ground ginger
1/2 teaspoon ground cinnamon
1/2 teaspoon finely grated orange zest
Preheat the oven to 350 degrees and place the rack in the middle of the oven. Line a 12-cup muffin tin with paper liners. Pulse the crystallized ginger in a food processor until finely ground, then add flour, ginger, cinnamon, zest, salt, baking soda, and baking powder, and pulse until combined.
Whisk together the zucchini, oil, honey, eggs, and vanilla in a medium bowl, then stir in the flour mixture until just combined. Divide the batter among the muffin cups, filling almost to the top. Bake until golden, and a tester inserted in the center of the cakes comes out clean, about 20-24 minutes. Cool the cupcakes in the pan on a wire rack for 10 minutes, then remove from pan and cool completely, one hour.
Beat together frosting ingredients with an electric mixer on high speed until light and fluffy, 3-5 minutes. Frost the tops of the cool cupcakes, and garnish with crystallized ginger chips, if desired.
Makes 12
The cupcakes can be made one day ahead and stored in an airtight container.

I knew we were going to be bombarded with more zucchini than we could handle, so I started planning early which recipes I most wanted to try once the harvest was upon us. I made a handful of dishes, both sweet and savory during the past month, all starring zucchini. Our favorite savory dish was the Pappardelle with Zucchini and Mint Parsley Pesto, from this month's Food and Wine. With long strips of zucchini, chewy pappardelle, and the bright taste of the pesto, full of the clean and refreshing flavors of mint and parsley, this dish was simple and satisfying, and wonderful alongside a nice cold glass of white wine.
 And our favorite sweet dish? Zucchini and Ginger Cupcakes from Gourmet last month. The recipe was just different enough, that I couldn't resist trying it. Most zucchini and loaf cakes, for that matter, contain somewhat shocking amounts of sugar and oil, so when I read that this recipe used olive oil, and honey for the sweetener, I was intrigued. I knew the honey would contribute an incredible amount of moisture, which it did, and the olive oil was indiscernable as a flavor, but I loved using it instead of corn or canola oil. The cakes are delicate, and just lightly sweet, which was a welcome contrast to the absolutely delicious cream cheese frosting. The frosting was made of mostly cream cheese, with a few tablespoons of butter, and a relatively small amount of powdered sugar. I loved the addition of cinnamon and ground ginger, which gave the frosting a speckled and golden appearance, and added an interesting and somewhat sophisticated note to the cupcake.
 I made a few changes to the recipe, like using 25% whole wheat flour, and using Neufetchal instead of full-fat cream cheese. I also only had extra-virgin olive oil in the pantry, so I used that, and found no issue with the flavor. I had also forgotten to pick up an orange at the store, so I used a little orange juice instead in the frosting, and I used some candied orange peel in the cakes, but next time I will definitely use the orange zest both in the cupcake and in the frosting, because I always love the addition of orange zest, and I think it would add a welcome "high note" in the flavors. I also garnished with some candied ginger, which the recipe doesn't call for, but which they show in the picture. I also happen to love raisins, so next time I make these, I will throw some rum-soaked raisins in the batter....because there will definitely be a next time!

Zucchini Ginger Cupcakes
Gourmet Magazine, Fresh from the Farm, July 2006
Cupcakes:
1/3 cup crystallized ginger (1 3/4 oz), coarsely chopped
2 cups all-purpose flour (or substitute 1/2 cup whole wheat)
1 teaspoon groung ginger
1 teaspoon ground cinnamon
1 teaspoon finely grated orange zest
1 teaspoon salt
1 teaspoon baking soda
1/2 teaspoon baking powder
2 cups grated zucchini
3/4 cup mild olive oil
3/4 cup mild honey
2 large eggs, lightly beaten
1 teaspoon vanilla
Frosting:
8 oz cream cheese or neufetchal
2 tablespoons unsalted butter, softened
1/2 cup confectioner's sugar
1 teaspoon vanilla
1/2 teaspoon ground ginger
1/2 teaspoon ground cinnamon
1/2 teaspoon finely grated orange zest
Preheat the oven to 350 degrees and place the rack in the middle of the oven. Line a 12-cup muffin tin with paper liners. Pulse the crystallized ginger in a food processor until finely ground, then add flour, ginger, cinnamon, zest, salt, baking soda, and baking powder, and pulse until combined.
Whisk together the zucchini, oil, honey, eggs, and vanilla in a medium bowl, then stir in the flour mixture until just combined. Divide the batter among the muffin cups, filling almost to the top. Bake until golden, and a tester inserted in the center of the cakes comes out clean, about 20-24 minutes. Cool the cupcakes in the pan on a wire rack for 10 minutes, then remove from pan and cool completely, one hour.
Beat together frosting ingredients with an electric mixer on high speed until light and fluffy, 3-5 minutes. Frost the tops of the cool cupcakes, and garnish with crystallized ginger chips, if desired.
Makes 12
The cupcakes can be made one day ahead and stored in an airtight container.

Sunday, July 16
Thoughts on Mexican Food, and Cake....Somewhat Unrelated
Dustin and I have often commented to each other how, if we only had to eat one type of cuisine for the rest of our days, it would surely be Mexican. Not necessarily because we'd want to eat it every day, but because the idea of giving it up is unacceptable. Life without tacos, enchiladas, or fiery chiles and beans, covered in mole sauce? No more guacamole or corn tortillas? No gracias.
Because of my deep love of food from south of the border, I have a crush on Rick Bayless. He's cute, he's a hippie of sorts, and he is the demi-god of Mexican cusines in the U.S. His restaurants in Chicago, Frontera Grill and Topolobampo, are two of my favorites to eat at when I'm at home. Dustin and I love to indulge in their excellent margaritas, delicious ceviche, and finally, some of the most delicious Mexican you can find in the states. I'm sure the desserts are delicious as well, but I prefer to fill up on the savory side of the menu...usually to the point of uncomfortableness.
It should come as no surpise then, that I own all of Rick Bayless' cookbooks. His most recent, Mexican Everyday, is my favorite, because, like the cover says, the recipes are the stuff of everyday cooking. His tacos made with swiss chard, sauteed with onions and garlic, served in corn tortillas with gooey melted cheese have become one of my standards, and there is not one recipe in the book I'm not looking forward to trying. Dustin and I have tacos once a week, or some other Mexican dish, so I plan on cooking this book from front to back.
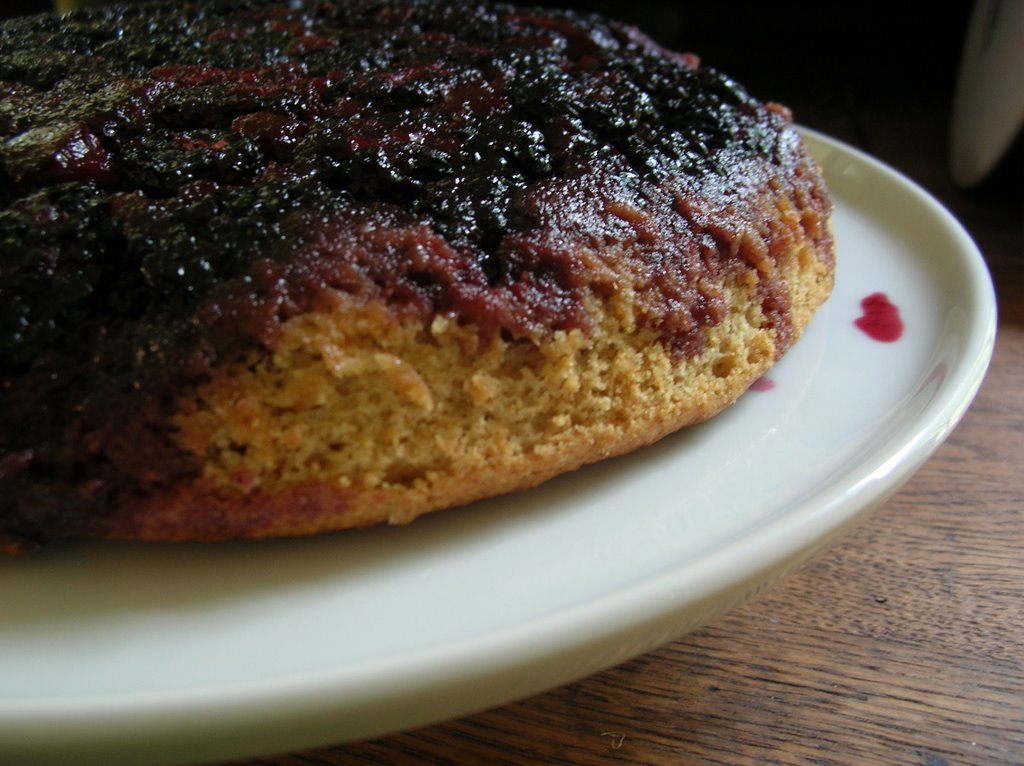
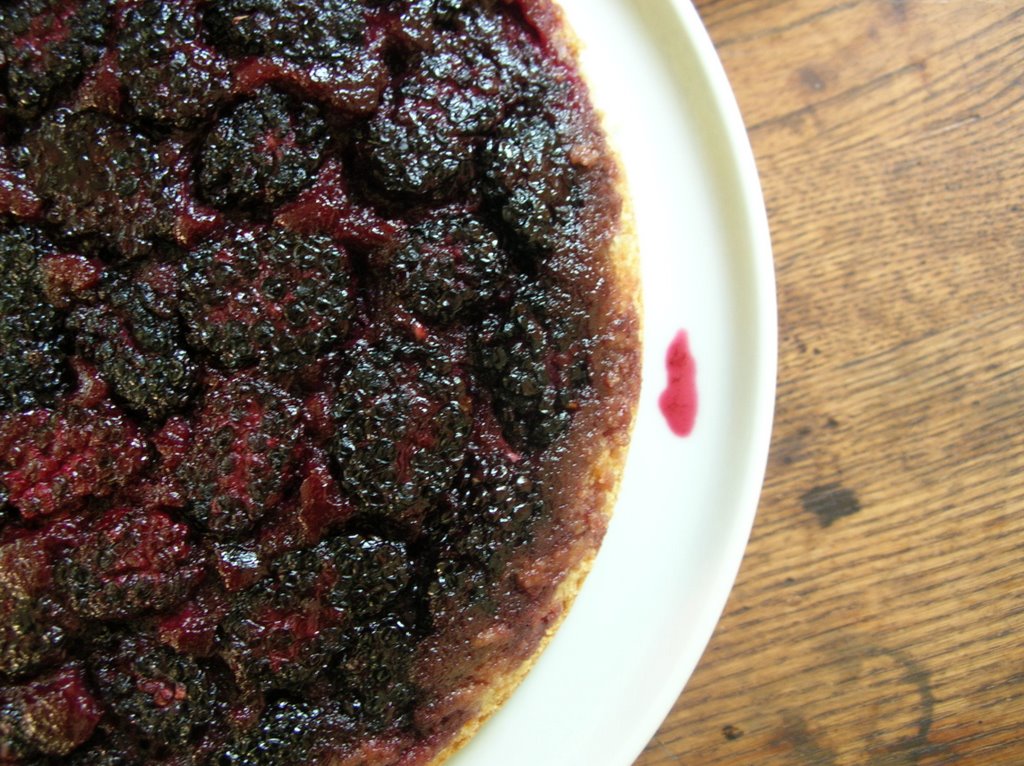
I had been wanting to try the recipe for Upside Down Fruit Cake in the book, because it was a simple recipe, containing half wheat flour, and a good dose of yogurt, which sounded wholesome enough, and called for browning the butter before adding to the batter, which is something I've never tried in baking before. Although I was expecting a delicious result, the cake exceeded my expectations on all counts.

The recipe calls for any variety of fruit, and I happened to have another gorgeous quart of blackberries from the farmer's market, which Bayless noted were an especially good match with the nutty taste of the wheat flour. The cake is tender and rich with the flavor of the browned butter, and the blackberries cooked just long enough to soften and melt ever slightly into the batter. This is the kind of cake that will disappear, piece by piece, as you find yourself slicing off one sliver after another. Usually I find the willpower to wait until after dinner to indulge in a large helping of dessert, but this cake was so good, I couldn't help myself - and I imagine you won't be able to either.
Blackberry Skillet Upside Down Cake
Adapted from Mexican Everyday, by Rick Bayless
Serves 8
3 ounces (6 Tbsp) butter, preferably unsalted
1/2 cup packed brown sugar, light or dark
3 cups blackberries
3/4 cup all-purpose flour
3/4 cup whole wheat flour
1/2 teaspoon salt
1/4 teaspoon baking soda
1 teaspoon baking powder
3/4 cup sugar (I use raw sugar)
1 large egg
3/4 cup whole milk plain yogurt
Preheat the oven to 375 degrees. Melt the butter in a large skillet (10 inches), with an ovenproof handle, over medium heat. Swirl the butter in the skillet until it turns nut-brown, then pour into a medium bowl. Sprinkle the brown sugar evenly over the skillet (do not wipe clean), and arrange the fruit in an even layer over the sugar.
In a large bowl, whisk together the flour, salt, baking soda, and baking powder. Add the sugar to the browned butter and whisk until thoroughly combined. Whisk in the egg, then the yogurt. Pour the wet ingredients over the dry and whisk to combine.
Pour the batter evenly over the fruit and smooth the top. Slide the skillet into the oven and bake for 30-35 minutes, or until the cake is golden brown and the center springs back when lightly touched. Remove the cake from the oven and let cool on a wire rack for 10 minutes.
Invert the cake and remove the skillet. The cake is wonderful warm from the oven, but also holds up quite nicely for a day or two, well-wrapped, at room temperature.
Friday, July 14
The Ghost of Freshman Past
When I was a freshman in college, I subsisted solely upon Grape-Nuts, Veggie Burgers, Grilled Cheese and Tater Tots. Oh, what a happy day Grilled Cheese Day was! I had friends that would eat 5 or 6 at a time! Occasionally, the cafeteria gods would smile upon us suffering underclassmen, and they would proclaim that we should be served something different....something healthy, but tasty....and they would serve us Stuffed Peppers. In Kittridge Hall, they would stuff green peppers with couscous and vegetables...they were a little boring, so I'd always top them with whatever soup or pasta sauce was offered that day. Dorm room living wasn't glamorous, but it sure was easy, wasn't it?
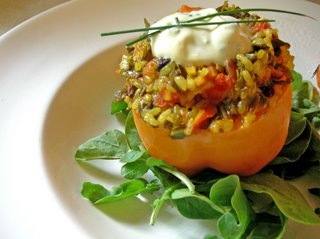
I would hardly say that stuffed peppers were ever a favorite of mine, but in the dredges of a freshman diet, they create an excitement that is surpassed only by a meal eaten OUTSIDE the dorms. This is no shining introduction to our recent dinner of Stuffed Peppers with Spicy Collards and Scallion Pilaf, but it is the truth. Stuffed Peppers have a pretty homely reputation, and it is for good reason. Vegetarian versions still carry with them that 70's veggie vibe that scares most people away from "vegetarian" eating. BUT, if something is good, and it happens to be meat free, then most people will gladly forget their carnivorous ways.
Dustin and I don't eat meat that often, and it's especially easy to forgo eating meat during the summer, when there is produce knocking down the door, and taking over the refrigerator. Lately we've eaten some fantastic vegetarian meals, like Zucchini and Corn Enchiladas, from Fields of Greens, Mediterranean Panzanella from Martha Stewart, and Linguine with Parsley-Mint Pesto, from this month's Food and Wine. These stuffed peppers came from Food and Wine as well, and were featured in their regular Well-Being section, in an article about cookbook writer Celia Brooks Brown. I changed the recipe according to what I had on hand, and added a quick yogurt sauce flavored with chives, lemon juice, honey and cayenne pepper. It turned out to be a delicious and virtuous dinner, which I love, because it left plenty of room for dessert. More on that later.
I'd say that stuffed peppers are the the most flexible dish in the world - add whatever you have in your fridge, but just make sure you add some texture and some serious flavor, or they can turn out a little bland. I'd also recommend cooking them long enough that the peppers get really nice and soft... if they are still a bit toothsome, they will lack depth of flavor. It is helpful to make the stuffing ahead of time, if you want to cook this on a weeknight, because of the long cooking time.
Stuffed Peppers with Spicy Greens and Scallion Pilaf
Adapted from Food and Wine, Celia Brooks Brown, Aug 2006
1 1/2 cups short-grain brown or white rice, rinsed and drained, cooked according to package directions
3/4 lb Swiss Chard or Collards, trimmed, ribs discarded
1/4 cup extra virgin olive oil
6 medium scallions, thinly sliced
2 garlic cloves
3/4 teaspoon tumeric
3/4 teaspoon ground cumin
3/4 teaspoon ground ginger
1/4 teaspoon cinnamon
1/4 teaspoon cayenne pepper
1 medium tomato, diced
3 tablespoons currants, soaked in white wine if desired
3 tabelspoons pine nuts, toasted
Fresh lemon juice
Salt and Pepper
4 Yellow or Orange Peppers
1 cup veggie or chicken broth, or 1/2 broth, 1/2 white wine
For Yogurt Sauce
1/2 cup Greek yogurt
2 tablespoons minced chives
1 tablespoon lemon juice
1 tablespoon honey
pinch of cayenne
Preheat oven to 400 degrees.
In a large skillet, heat 1/2 inch water to a boil. Add the chard or collards and cook until tender, about 2-3 minutes. Drain and let cool, then squeeze dry and coarsely chop.
Heat the olive oil in the same skillet over moderate heat. Add the scallions and garlic and cook until softened and fragrant. Season with salt and pepper, and then add the spices and cook, stirring, another 2 minutes. Deglaze the pan with a little white wine, if you happen to have some on hand, or in hand! Add the chard and currants and cook until the liquid evaporates. Add the chopped tomato and cook a few minutes longer. Remove the skillet from the heat and add the cooked rice. Squeeze a few tablespoons of fresh lemon juice over the mixture. Season with salt and pepper.
Cut the tops off the peppers and reserve. Scoop out the seeds and ribs. Spoon the rice filling into the peppers and replace the tops. Stand the peppers in a baking dish that will hold them snuggly, and pour in the broth (and wine if using). Cover tightly with foil and bake 1 hour, or longer, until the peppers are tender. Serve warm or at room temperature.

I would hardly say that stuffed peppers were ever a favorite of mine, but in the dredges of a freshman diet, they create an excitement that is surpassed only by a meal eaten OUTSIDE the dorms. This is no shining introduction to our recent dinner of Stuffed Peppers with Spicy Collards and Scallion Pilaf, but it is the truth. Stuffed Peppers have a pretty homely reputation, and it is for good reason. Vegetarian versions still carry with them that 70's veggie vibe that scares most people away from "vegetarian" eating. BUT, if something is good, and it happens to be meat free, then most people will gladly forget their carnivorous ways.
Dustin and I don't eat meat that often, and it's especially easy to forgo eating meat during the summer, when there is produce knocking down the door, and taking over the refrigerator. Lately we've eaten some fantastic vegetarian meals, like Zucchini and Corn Enchiladas, from Fields of Greens, Mediterranean Panzanella from Martha Stewart, and Linguine with Parsley-Mint Pesto, from this month's Food and Wine. These stuffed peppers came from Food and Wine as well, and were featured in their regular Well-Being section, in an article about cookbook writer Celia Brooks Brown. I changed the recipe according to what I had on hand, and added a quick yogurt sauce flavored with chives, lemon juice, honey and cayenne pepper. It turned out to be a delicious and virtuous dinner, which I love, because it left plenty of room for dessert. More on that later.

I'd say that stuffed peppers are the the most flexible dish in the world - add whatever you have in your fridge, but just make sure you add some texture and some serious flavor, or they can turn out a little bland. I'd also recommend cooking them long enough that the peppers get really nice and soft... if they are still a bit toothsome, they will lack depth of flavor. It is helpful to make the stuffing ahead of time, if you want to cook this on a weeknight, because of the long cooking time.
Stuffed Peppers with Spicy Greens and Scallion Pilaf
Adapted from Food and Wine, Celia Brooks Brown, Aug 2006
1 1/2 cups short-grain brown or white rice, rinsed and drained, cooked according to package directions
3/4 lb Swiss Chard or Collards, trimmed, ribs discarded
1/4 cup extra virgin olive oil
6 medium scallions, thinly sliced
2 garlic cloves
3/4 teaspoon tumeric
3/4 teaspoon ground cumin
3/4 teaspoon ground ginger
1/4 teaspoon cinnamon
1/4 teaspoon cayenne pepper
1 medium tomato, diced
3 tablespoons currants, soaked in white wine if desired
3 tabelspoons pine nuts, toasted
Fresh lemon juice
Salt and Pepper
4 Yellow or Orange Peppers
1 cup veggie or chicken broth, or 1/2 broth, 1/2 white wine
For Yogurt Sauce
1/2 cup Greek yogurt
2 tablespoons minced chives
1 tablespoon lemon juice
1 tablespoon honey
pinch of cayenne
Preheat oven to 400 degrees.
In a large skillet, heat 1/2 inch water to a boil. Add the chard or collards and cook until tender, about 2-3 minutes. Drain and let cool, then squeeze dry and coarsely chop.
Heat the olive oil in the same skillet over moderate heat. Add the scallions and garlic and cook until softened and fragrant. Season with salt and pepper, and then add the spices and cook, stirring, another 2 minutes. Deglaze the pan with a little white wine, if you happen to have some on hand, or in hand! Add the chard and currants and cook until the liquid evaporates. Add the chopped tomato and cook a few minutes longer. Remove the skillet from the heat and add the cooked rice. Squeeze a few tablespoons of fresh lemon juice over the mixture. Season with salt and pepper.
Cut the tops off the peppers and reserve. Scoop out the seeds and ribs. Spoon the rice filling into the peppers and replace the tops. Stand the peppers in a baking dish that will hold them snuggly, and pour in the broth (and wine if using). Cover tightly with foil and bake 1 hour, or longer, until the peppers are tender. Serve warm or at room temperature.

Monday, July 3
If You're Going to Eat a Brownie
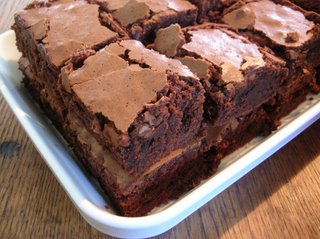
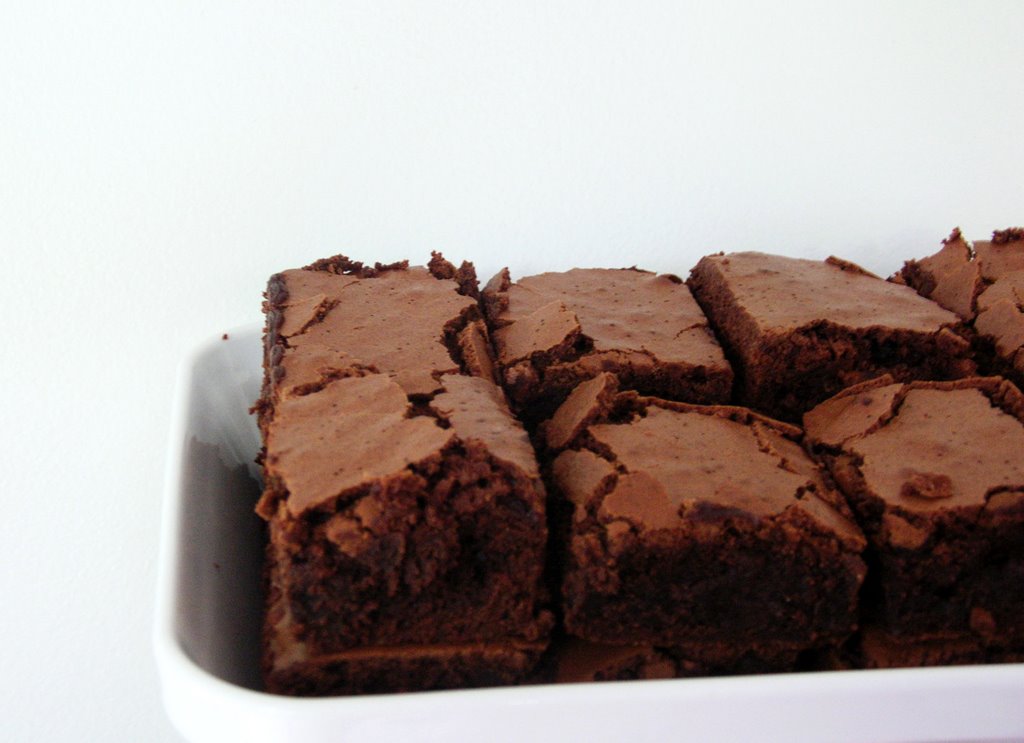
Brownies are a favorite dessert of many, yet they are often misunderstood, and therefore, require some study if one is to pursue a brownie worth their while. A brownie is, above all, a means by which chocolate and sugar are delivered to the palate. A piece of cake can never satisfy in the same way a dense and crackly-topped brownie can, and because a brownie is far easier to assemble and bake, requires less equipment, and is more easily enjoyed than most cakes, one might even call a brownie more egalitarian than a piece of cake.

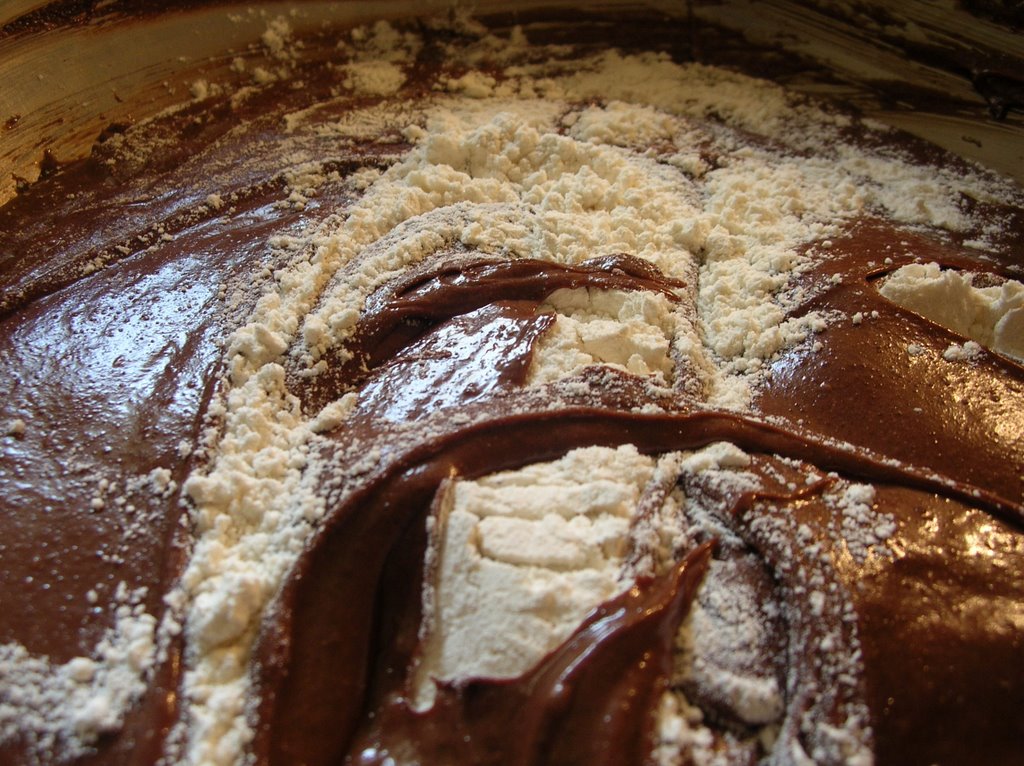
The single most important ingredient in a brownie is chocolate. Obvious, no? The chocolate may be present in the form of either melted high-quality chocolate, or cocoa - there are fine brownies to be had in both categories, but the brownie under the lens today is that which starts by melting chocolate and butter slowly together over gentle heat, until fully incorporated into one delicious union of fat and flavor. Beyond this crucial step, sugar is added for sweetness, eggs for their binding and lifting qualities, a small amount of flour for structure, salt for heightened flavor, and vanilla for its smooth flavor and affinity for our star ingredient.
There are some unfortunate souls out there that are confused about brownies, and are easily duped into consuming brownie-imposters. Once armed with the proper criteria by which to judge an excellent brownie, even a beginner can recognize the real thing.
The Rules of Brownie Engagement
As laid down upon this fourth day of July, 2006
1. A brownie must never originate from a box, or include in it's directions, "just add water".
2. A brownie must be fudgy, never cakey
3. A brownie should never wear a crown of frosting; to do so redefines said brownie into a new classification. Cake.
4. A brownie should have at minimum two distinct textures present; an excellent brownie displays 3 variant textures.
5. When baking brownies, always set the timer earlier than the recipe's baking time would suggest; the fastest way to ruin a brownie is to overbake it. When in doubt, pull them out! An undercooked brownie never hurt anyone, but an overcooked brownie has disappointed many a soul.
6. A brownie should always be consumed in the presence of some form of dairy product; milk and ice cream are highly recommended. To consume without dairy back-up is to diminish the palate's ability to fully experience the brownie's nuanced flavors.
In my time as a serious brownie baker, I have encountered only a handful of recipes that have made it into my recipe binder. My first encounter with outrageous brownies was Palm Beach Brownies, by Maida Heatter, and my most recent encounter was with David Lebovitz's Absolute Best Brownies with Dried Cherries. After receiving the Martha Stewart Baking Handbook a few months back, I immediately tagged the Fudgy Brownies, hoping they would be everything they promised....dense and fudgy, and not for the faint of heart. I am happy to report, this brownie scores top points in all categories, and will be permanetly added to my brownie rotation.
Fudgy Chocolate Brownies
Adapted from Martha Stewart's Baking Handbook
The recipe below differs from the published recipe in that it is doubled.
Makes 16 large or 32 regular brownies
16 ounces unsalted butter (2 sticks), sliced into 1-inch pieces
16 ounces good-quality bittersweet chocolate, roughly chopped
3 cups sugar
8 large eggs
2 teaspoons vanilla extract
1 1/2 cups flour
1 teaspoon salt
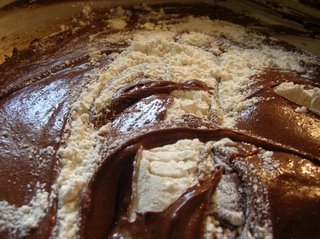
Preheat the oven to 350 degrees. Line a 9 x 13 inch baking pan with foil, leaving a 1-inch overhang on two sides. Butter the foil; set aside. Place butter and chocolate in a heatproof bowl set over simmering water; stir frequently until chocolate and butter are melted, about 10 minutes. Remove bowl from heat; let cool to room temperature, 15 - 20 minutes.
Stir the sugar vigorously into the melted chocolate with a wooden spoon until combined. Stir in the eggs one at a time, until fully incorporated. Whisk in the vanilla. Gently fold in the flour and salt.
Pour the batter into the prepared pan, and smooth top. Bake until a cake tester inserted in the middle comes out with only a few moist crumbs attached, anywhere from 35-45 minutes. Start checking the brownies around 30 minutes to gauge how quickly they are baking; do not overbake! Transfer the pan to a wire rack to cool completely.
The single most important ingredient in a brownie is chocolate. Obvious, no? The chocolate may be present in the form of either melted high-quality chocolate, or cocoa - there are fine brownies to be had in both categories, but the brownie under the lens today is that which starts by melting chocolate and butter slowly together over gentle heat, until fully incorporated into one delicious union of fat and flavor. Beyond this crucial step, sugar is added for sweetness, eggs for their binding and lifting qualities, a small amount of flour for structure, salt for heightened flavor, and vanilla for its smooth flavor and affinity for our star ingredient.
There are some unfortunate souls out there that are confused about brownies, and are easily duped into consuming brownie-imposters. Once armed with the proper criteria by which to judge an excellent brownie, even a beginner can recognize the real thing.
The Rules of Brownie Engagement
As laid down upon this fourth day of July, 2006
1. A brownie must never originate from a box, or include in it's directions, "just add water".
2. A brownie must be fudgy, never cakey
3. A brownie should never wear a crown of frosting; to do so redefines said brownie into a new classification. Cake.
4. A brownie should have at minimum two distinct textures present; an excellent brownie displays 3 variant textures.
5. When baking brownies, always set the timer earlier than the recipe's baking time would suggest; the fastest way to ruin a brownie is to overbake it. When in doubt, pull them out! An undercooked brownie never hurt anyone, but an overcooked brownie has disappointed many a soul.
6. A brownie should always be consumed in the presence of some form of dairy product; milk and ice cream are highly recommended. To consume without dairy back-up is to diminish the palate's ability to fully experience the brownie's nuanced flavors.
In my time as a serious brownie baker, I have encountered only a handful of recipes that have made it into my recipe binder. My first encounter with outrageous brownies was Palm Beach Brownies, by Maida Heatter, and my most recent encounter was with David Lebovitz's Absolute Best Brownies with Dried Cherries. After receiving the Martha Stewart Baking Handbook a few months back, I immediately tagged the Fudgy Brownies, hoping they would be everything they promised....dense and fudgy, and not for the faint of heart. I am happy to report, this brownie scores top points in all categories, and will be permanetly added to my brownie rotation.
Fudgy Chocolate Brownies
Adapted from Martha Stewart's Baking Handbook
The recipe below differs from the published recipe in that it is doubled.
Makes 16 large or 32 regular brownies
16 ounces unsalted butter (2 sticks), sliced into 1-inch pieces
16 ounces good-quality bittersweet chocolate, roughly chopped
3 cups sugar
8 large eggs
2 teaspoons vanilla extract
1 1/2 cups flour
1 teaspoon salt
Preheat the oven to 350 degrees. Line a 9 x 13 inch baking pan with foil, leaving a 1-inch overhang on two sides. Butter the foil; set aside. Place butter and chocolate in a heatproof bowl set over simmering water; stir frequently until chocolate and butter are melted, about 10 minutes. Remove bowl from heat; let cool to room temperature, 15 - 20 minutes.
Stir the sugar vigorously into the melted chocolate with a wooden spoon until combined. Stir in the eggs one at a time, until fully incorporated. Whisk in the vanilla. Gently fold in the flour and salt.
Pour the batter into the prepared pan, and smooth top. Bake until a cake tester inserted in the middle comes out with only a few moist crumbs attached, anywhere from 35-45 minutes. Start checking the brownies around 30 minutes to gauge how quickly they are baking; do not overbake! Transfer the pan to a wire rack to cool completely.

Lake Food
I grew up in the Midwest, where thousands of families flock to the closest body of water on weekends and holidays alternately to relax, and punish themselves with all sorts of water sports, which leave them groaning and aching on Monday mornings. Spending the entire day baking in the sun, with the sound of boat engines and waves lapping in the background, and the complete exhaustion that comes at the end of a day at the lake, is one of my fondest childhood memories.
And what would a fond memory be without some reference to the food that was enjoyed during those blissful times? There was a tiny place on the lake where we boated, and now have a lake house, which we called "McGoos". The origin of this name is somewhat of a mystery, since the actual name is "Gordy's", but we like the name, and so that's what we call it. We would pull our boat up to the dock in front of McGoo's, hop onto the scorching deck, high-step it the 30 feet or so to the inevitable line forming outside the tiny shack that is McGoo's, and wait in line, discussing whether it would be a hamburger, hot dog, or a soggy that day. For those of you unfamiliar with a Soggy, it is a an ode to what the Midwest does best; simple comfort food. Some cubes of leftover french bread (more likely italian beef buns) are drenched in Au Jus, and covered in a layer of mozzarella cheese, which is toasted until hot and covered with golden bubbles. There is nothing sexy or terribly attractive about a soggy, but in the world of comfort food, it reigns supreme.
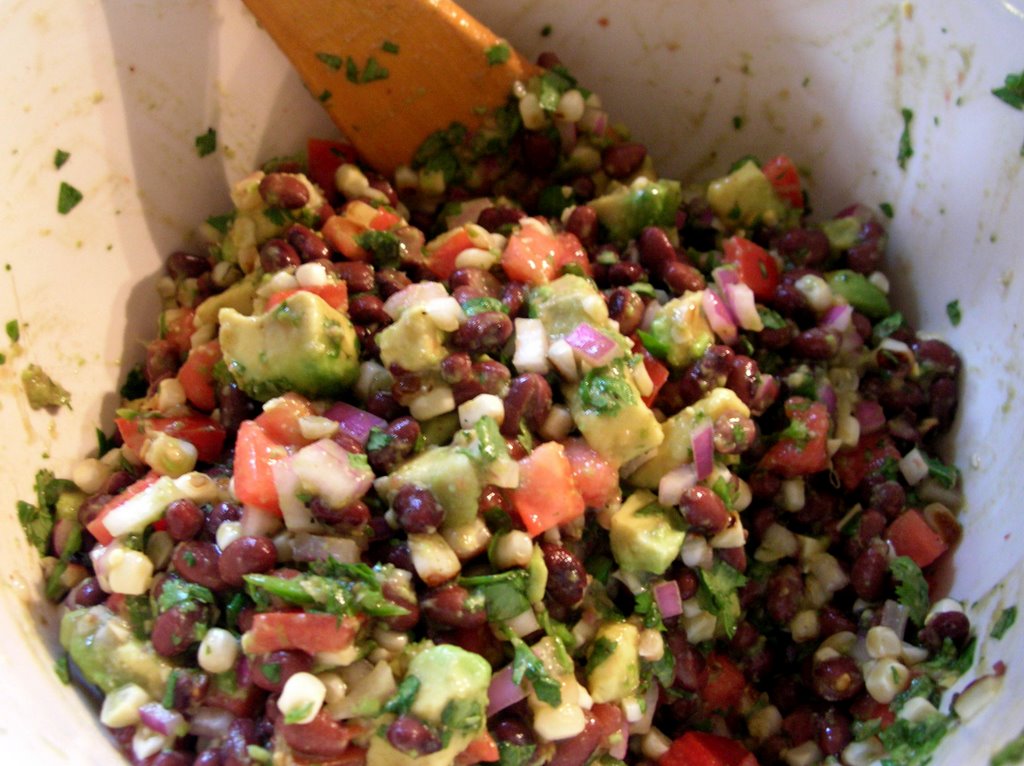
When we were invited last week to spend the weekend at our friend Josh's family lakehouse, we wanted to bring something along that would sustain us all for the weekend - a snack that everyone would enjoy, and that was easy to make. Nowadays, there are so many things that I like to call Lake Food, I've realized that this classification falls upon anything that tastes even more delicious eaten in the sun, accompanied by an ice cold beer. We decided to make Black Bean Salsa, which is our becoming a classic in our house, because you can make a gigantic bowl, and feast upon it for days.
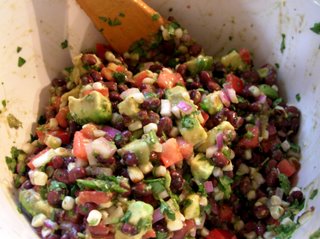
This salsa is like a meal...chock full of beans, avocado, big chunks of tomato, and corn, it is deeply satisfying, and tastes delicious atop a salty chip, washed down with a fine American brew. This salsa happens to be Dustin's specialty, and he never cooks from a recipe, so I'll give general measurements, because really, everything is to taste. After two full days of wakeboarding, toasting ourselves in the sun, and emptying our gigantic cooler of beer, the salsa was gone, and we were sun-kissed and exhausted - a wonderful way to end a weekend.
Black Bean Salsa
2 cans black beans, rinsed and drained
2 ears corn, either boiled or roasted
2 large or 3 medium tomatoes, cut into small chunks and drained
2 firm-ripe avocados, cut into medium chunks
1 red onion, diced small
3 garlic cloves, minced
2-3 limes
1 bunch of cilantro
Olive oil
Red wine vinegar
Salt and pepper
Place the black beans into a large serving bowl. After the corn has cooled, cut the kernels off the cob and add to the black beans, along with the tomatoes, red onion, and garlic. Toss to combine.
Drizzle the mixture with olive oil and about 2 tablespoons of red wine vinegar, or to taste. Squeeze the limes over the mixture, and season with salt and pepper. Let the mixture sit for about fifteen minutes before tasting for seasonings again.
You can wait until just before serving to add the avocado chunks and chopped cilantro, but we add it all at once - after awhile the avocado will start to break down, but it usually last a full day or two before that happens.
Also keep in mind that you can add anything you think would be tasty to this salsa - it's as flexible as you are. We added fresh basil and mint from our garden this time, since we have an abundance of both!
And what would a fond memory be without some reference to the food that was enjoyed during those blissful times? There was a tiny place on the lake where we boated, and now have a lake house, which we called "McGoos". The origin of this name is somewhat of a mystery, since the actual name is "Gordy's", but we like the name, and so that's what we call it. We would pull our boat up to the dock in front of McGoo's, hop onto the scorching deck, high-step it the 30 feet or so to the inevitable line forming outside the tiny shack that is McGoo's, and wait in line, discussing whether it would be a hamburger, hot dog, or a soggy that day. For those of you unfamiliar with a Soggy, it is a an ode to what the Midwest does best; simple comfort food. Some cubes of leftover french bread (more likely italian beef buns) are drenched in Au Jus, and covered in a layer of mozzarella cheese, which is toasted until hot and covered with golden bubbles. There is nothing sexy or terribly attractive about a soggy, but in the world of comfort food, it reigns supreme.
When we were invited last week to spend the weekend at our friend Josh's family lakehouse, we wanted to bring something along that would sustain us all for the weekend - a snack that everyone would enjoy, and that was easy to make. Nowadays, there are so many things that I like to call Lake Food, I've realized that this classification falls upon anything that tastes even more delicious eaten in the sun, accompanied by an ice cold beer. We decided to make Black Bean Salsa, which is our becoming a classic in our house, because you can make a gigantic bowl, and feast upon it for days.
This salsa is like a meal...chock full of beans, avocado, big chunks of tomato, and corn, it is deeply satisfying, and tastes delicious atop a salty chip, washed down with a fine American brew. This salsa happens to be Dustin's specialty, and he never cooks from a recipe, so I'll give general measurements, because really, everything is to taste. After two full days of wakeboarding, toasting ourselves in the sun, and emptying our gigantic cooler of beer, the salsa was gone, and we were sun-kissed and exhausted - a wonderful way to end a weekend.
Black Bean Salsa
2 cans black beans, rinsed and drained
2 ears corn, either boiled or roasted
2 large or 3 medium tomatoes, cut into small chunks and drained
2 firm-ripe avocados, cut into medium chunks
1 red onion, diced small
3 garlic cloves, minced
2-3 limes
1 bunch of cilantro
Olive oil
Red wine vinegar
Salt and pepper
Place the black beans into a large serving bowl. After the corn has cooled, cut the kernels off the cob and add to the black beans, along with the tomatoes, red onion, and garlic. Toss to combine.
Drizzle the mixture with olive oil and about 2 tablespoons of red wine vinegar, or to taste. Squeeze the limes over the mixture, and season with salt and pepper. Let the mixture sit for about fifteen minutes before tasting for seasonings again.
You can wait until just before serving to add the avocado chunks and chopped cilantro, but we add it all at once - after awhile the avocado will start to break down, but it usually last a full day or two before that happens.
Also keep in mind that you can add anything you think would be tasty to this salsa - it's as flexible as you are. We added fresh basil and mint from our garden this time, since we have an abundance of both!
Subscribe to:
Posts (Atom)