Thursday, June 29

I'm Berry Overwhelmed


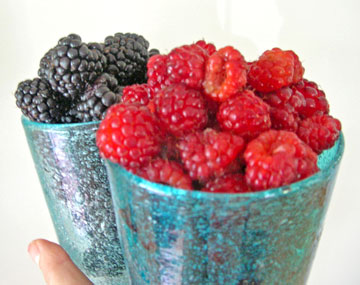
Is it possible to have too many berries? To feel burdened by the amount of juicy little treasures that you find yourself in possession of? My excitement got the better of me at the farmer's market last weekend, and by mid week, I was in a tizzy trying to think of ways to use up my berry bowl.

Despite the fact that I feel like I've overindulged in desserts lately, I couldn't think of any better use for a great pile of berries than to throw them into a pie, so that they would meet their end in a much more respectable way than by mold and fruit flies upon my countertop.

I turned to several of my cookbooks looking for inspiration, but quickly decided on sticking to what is becoming my "go-to" bible for all things sweet and fruity. Ripe for Dessert, by David Lebovitz, is a beautiful book, filled with gloriously tempting recipes, all of which put fruit center-stage. I have tried several recipes from the book that I will absolutely make again and again; Apple and Pear Crisp with Polenta Topping and Grappa-Soaked Raisins, Absolute Best Brownies with Dried Cherries, and Peppery Chocolate Cherry Biscotti.

I decided on Boysenberry Turnovers. I've never made a turnover, but love the idea of a hand-held pie. My favorite local bakery, Ollie's, sets the standard in this category, and my I wanted to see if I could create something that would compete with their pastry-perfection. My turnovers were, well, "rustic" in appearance, but I'm certain that nothing more than a little practice would remedy the issue, and a closer eye on the directions....I folded my turnovers into a square shape, instead of the triangle that David intended.

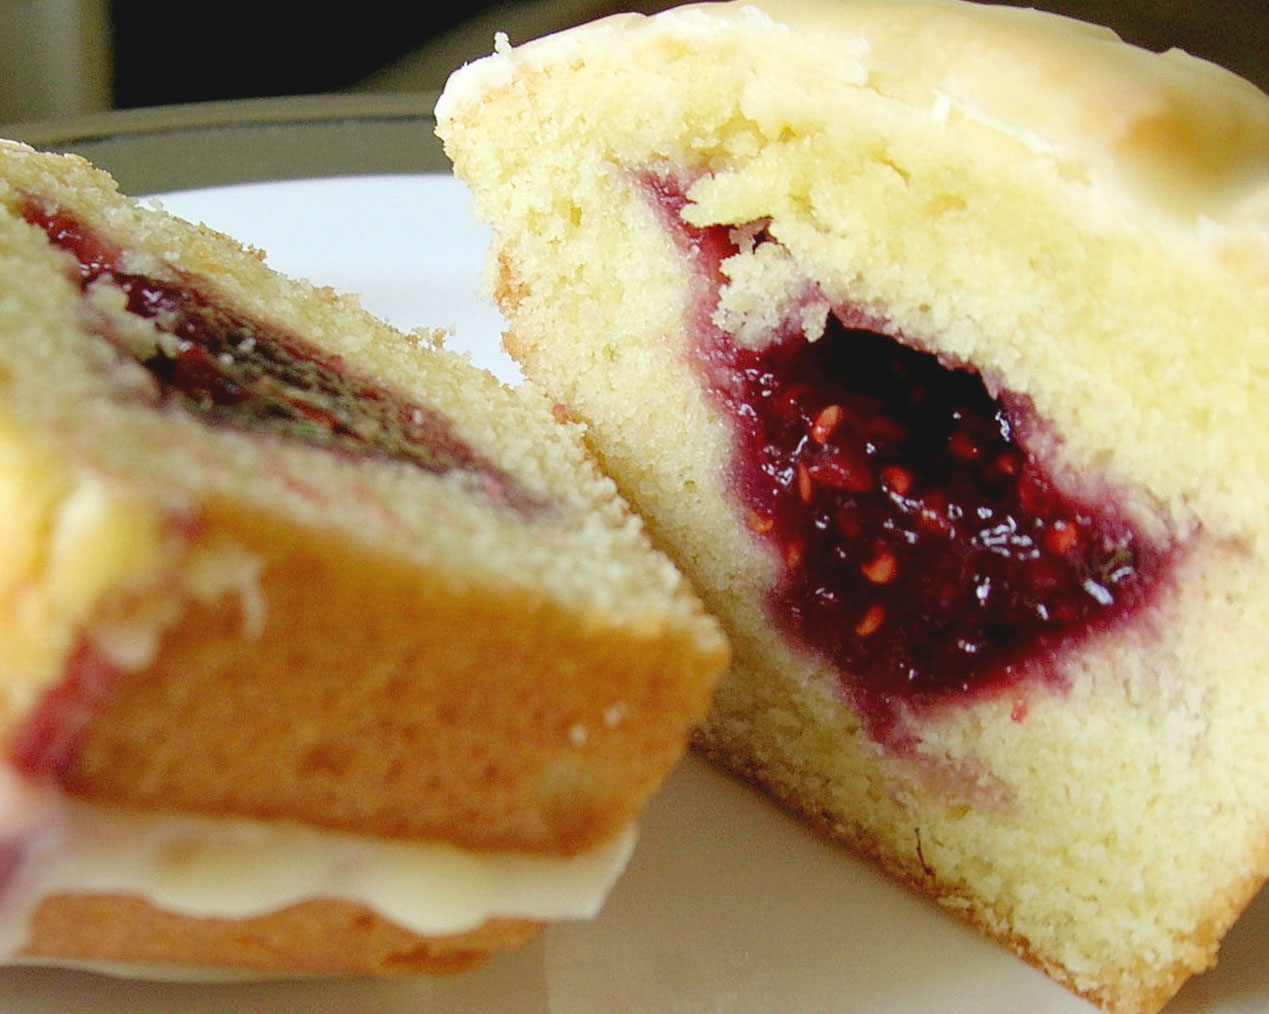
I strayed from the recipe only in that I used a mixture of blackberries and raspberries for the filling, and used organic evaporated cane vanilla sugar. The turnovers were delicious, and I loved the strong presence of lemon in the filling, which really played off the sweet-tart flavor of the berries. The pastry had good flavor, but lacked the crispness that I was looking for, perhaps due to the addition of cream cheese in the dough, which was supposed to make it easier to roll out. I think next time around I would use my favorite pie crust recipe and see how the results differed. The leftover turnovers had definitely turned "soft" the next day, but I still polished one off with no problems. With some experimenting, I'd say this recipe is a keeper.

Berry Turnovers
Slightly adapted from Ripe for Dessert, by David Lebovitz

For Dough:
1 cup flour
1 tablespoon sugar
1/2 teaspoon salt
5 tablespoons unsalted butter, cut into 1/2 inch cubes and chilled
2 ounces cream cheese, also chilled
3 tablespoons ice water

The Filling:
2 1/4 cups berries
2 tablespoons sugar
Grated zest of 1 lemon
1 tablespoon flour
1 egg yolk
1 teaspoon milk or heavy cream
Turbinado sugar for sprinkling

To make the dough: Mix together the flour, sugar, and salt. In the food processor, mix in the butter pieces until they're half their original size. Add the cream cheese in small pieces and contine to pulse until the pieces of butter are like small peas.

Transfer the mixture to a bowl and sprinkle the ice water over. Gently mix in, just until the dough comes together, adding more water if necessary, only 1/2 tablespoon at a time. Wrap in plastic and shape into a thick, flat square. Refrigerate one hour or longer.

To bake the turnovers, position the oven rack in the center of the oven and preheat to 400 degrees. Line a baking sheet or nonstick baking mat with parchment (don't skip this! they make a mess!).

To make the filling: Toss the berries, sugar, lemon zest and flour together in a medium bowl.

Divide the dough into 4 even pieces. Only a lightly floured surface, roll each piece out into a 5 inch square (or as close as you can get to a square!). Place one quarter of the berry mixture in the center of each square of dough. Brush the inside edges of the pastry with water and fold the dough over the berries, enclosing the filling and create a triangular shaped turnover. Pinch or crimp the edges securely.

Beat together the egg yolk and the milk or cream, brush each turnover with the egg glaze, and sprinkle each one liberally with coarse sugar. Poke a slit in the top of each turnover with a sharp knife.

Place the turnovers on the prepared baking sheet and bake for 20 minutes. Serve warm or at room temperature.

Serves 4

Monday, June 26

To All the Corn I've Loved Before

This entry is for all the corn lovers out there. And for my lovely friend Nicki. She, like myself, can appreciate a good dose of cornmeal now and then. Maybe it's because I was raised in the Midwest, or maybe my mom ate a lot of corn while I was in the womb, but more likely, I am addicted to corn because it's sweet and tasty, and it appears in so many culinary guises that you could eat it every day and never tire of it. I will of course mention that there is one corn product I avoid at all costs; high-fructose corn syrup. The evils of this substance are widely known, so I will not bore you with my opinion on the matter.

While most people would dare not deny that corn on the cob, in the sweet days of late summer, is one of life's great pleasures, I'd like to draw your attention to the oft-underappreciated grain, cornmeal, and more specifically, the stone-ground variety. The difference between supermarket variety cornmeal and stone-ground cornmeal is that the stone-ground still retains the germ of the dried kernel, which translates to greater flavor, and a better nutritional profile.

This weekend Dustin and I decided to cook up a good old Southern meal, featuring barbequed chicken, greens with vinegar, and Vermont-Cheddar Spoonbread; a recipe I've had marked in my Best of Cooking Light cookbook since I got it 3 years ago. I might have chosen to accompany the meal with one of my favorites, Cornlight Bread, or the excellent Fresh-Corn Polenta I made last week, but I was in the mood to dabble in the unknown....and I'm glad I did. The spoonbread had all the best qualities of cornbread, but was light and slightly eggy, making a savory companion to the chicken and greens.


Vermont Cheddar Spoonbread
Adapted from Cooking Light

Cooking spray for dish
1/2 cup plus 2 teaspoons cornmeal, preferably stone-ground
1 1/2 cups skim milk (or 2%)
Salt and Pepper to taste
1 large egg, lightly beaten
2 large egg whites
1/2 cup (2 oz) shredded sharp Vermont Cheddar, (Parmesan or Asiago would be great, too), or more to taste
Chopped fresh herbs, such as chives, optional
Fresh Corn Kernels, optional

Preheat oven to 375 degrees.

Spray a one-quart souffle dish with cooking spray and sprinkle evenly with 2 teaspoon cornmeal.

Combine 1/2 cup cornmeal, milk, salt, and black pepper in a medium saucepan, and cook over medium heat 5 minutes or until thick, stirring constantly. Remove from heat.

Gradually stir 1/2 cup hot cornmeal mixture into egg yolk, and add to remaining cornmeal mixture, stirring constantly. Pour into a large bowl; cool completely.

Beat egg whites at high speed of a mixer until stiff peaks form. Gently fold egg whites and cheese into cornmeal mixture, and any additional herbs or vegetables. Spoon batter into prepared dish. Bake at 375° for 1 hour or until puffy and browned. Serve immediately.

Serves 4, or 2 people who really love corn.

Sunday, June 25

Sunday Morning Frittata

To me, there is nothing better suited for Sunday morning breakfast than eggs. Our eggs are delivered, bi-weekly, by my mother-in-law, and they come straight from the farm, where she and Tyler, my nephew, faithfully gather them every day. The yolks are a beautiful golden yellow color, and come in all shades of light greens, blues and pinks.

Our trip to the farmer's market yesterday left us with a bounty of vegetables to use, and a night of drinking and dancing at a co-worker's wedding left us craving a savory and hearty breakfast to help us ease our way into a lazy Sunday. I pulled out the Williams-Sonoma catalog, where I remembered seeing a recipe for a Spring Frittata.


A frittata is an imprecise affair, and I followed the basic formula of 6 eggs and 1/4 cup liquid, but my milk was skim, so I added a tablespoon of sour cream for richness. I crumbled some leftover feta into the bowl, along with some chopped parsley, sauteed leeks and zucchini, and some fresh peas. After a quick trip to the oven, our frittata was puffed and slightly golden, and we hovered with our coffee cups, slicing off two large wedges, and wrapping the rest up for lunch tomorrow - sandwiched between two slices of thick, crunchy bread, it's going to make a Monday lunch worth looking foward to.

Spring Frittata
6 eggs
1/4 cup cream (or milk)
Minced parsley or any combo of fresh herbs
2/3 cup crumbled or shredded cheese
Salt and pepper
2 cups of cooked vegetables, such as leeks, asparagus, zucchini, caramelized onions, roasted peppers, artichokes, or peas.

Preheat the oven to 350 degrees.

Whisk together the eggs and cream in a medium bowl, and season with salt and pepper. Add the chopped fresh herbs and cheese and lightly stir to combine. Add your cooked vegetables.

Heat a skillet over medium heat and melt 1/2 Tablespoon butter, swirling to coat the bottom of the pan. Pour your frittata mixture into the skillet, and use a wooden spoon evenly distribute vegetables throughout egg mixture.

Place in the preheated oven, and bake for 15 or 20 minutes, depending on the size and depth of your skillet. Turn out onto a plate, and then invert again, so that frittata is right-side up. Slice and Serve.

Serves 4 - 6

Friday, June 23

Rancho Gordo Beans

I have always been a fan of beans. Black ones, small ones, little ones and big ones....I love them all. Up until last month, I bought my beans where most people do - the grocery store.

I have never had the will power to resist the seduction of online shopping, and most of the time I can restrain myself for only so long before giving in to whatever I've been coveting, whether it be a new J.Crew bathing suit, a cool binder from Russel-Hazel, or the Best-Looking Beans I've ever seen.

I first read about Rancho Gordo Beans on Heidi Swanson's website, 101 Cookbooks. When I discovered this site, I felt like I had discovered a whole sub-section of society that shared the same sickness as me....an obsession with cooking, and more specifically, a totally unreasonable collection of cookbooks. Up until that point in time, I was riddled with guilt at each new book that made it's way to my cookbook shelf. I even went so far as to hide them from Dustin, so I wouldn't have to hear, "Did you really buy another cookbook?". With my discovery of the world of food blogging, came not only a sense of justification (I am not alone! I am not insane!), but also the discovery of new and wonderful food producers and distributors around the U.S., one of those being the folks at Rancho Gordo.


I admit, part of what I love about the company is their awesome label, and their funky attitude. They are based out of the San Francisco area, and they offer heirloom and hard to find varieties of beans and other grains. Having held out long enough, I placed an order a few weeks ago that will keep Dustin and I "in the beans" for the next 6 months! I also sprung for some pozole, and mexican oregano, which is so much more flavorful and floral than it's supermarket sister. It took me all of 3 seconds to decide which beans to try first, and get them into a bowl of cool water to soak...I chose the Borlotti Beans - the prettiest of the bunch.


The beans lost their lovely coloring and speckled appearance after cooking, but they were big and plump and made a bean-loving girl like me extremely pleased. I used part of the beans in a salad with some oil-packed tuna and sherry vinegar, some of them made their way into an impromptu version of baked beans, featuring some shallots, brown sugar and some hot smoked paprika. The final remaining beans were added to some wheat berries, along with some red wine vinegar, olive oil, minced garlic and oregano. I bought a piece of cherry-glazed salmon to top it off for lunch, and it made a tasty lunch indeed.

Expect to see more bean recipes and appearances from the Rancho Gordo label in this blog. I've got a mighty number of beans to eat! Scheduled for this weekend....Green Posole, to make use of the leftover tomatillos from Wednesday's Chile-Glazed Halibut (see below).

Thursday, June 22

The MSC

Last weekend, as I was walking into Whole Foods, I noticed a large white and blue sign hanging above the door, announcing the arrival of Marine Stewardship Council Halibut. Sounds good, I thought. After placing the carefully-wrapped package in my cart, I felt certain that dinner was going to be delicious, and I was pretty sure I had just done something good for our planet, but if you had asked me why it was good, I would have shrugged.

I decided to check out the Marine Stewardship Council website, and find out exactly why it's important to buy sustainably harvested fish. The organization started out under Unilever - producer of such ubiquitous brands as Dove, Bertolli, Hellman's, and Slim-Fast. Apparently, they are also the largest buyer of seafood in the world. I was happy to find out that the MSC is now independent, and is working to certify fisheries of all sizes around the world, in order to ensure the future health of our oceans, and the livelihoods of the people who fish for a living. MSC is the only internationally recognized set of environmental standards for measuring the sustainability of fisheries. Their standards were carefully developed over a over a two year period; they consulted scientists, fisherie experts, environmental organizations, and others who have a stake in the future of the industry (well, we all do, don't we?). With as much as 76% of the world's fish stocks being fully exploited (maximum biological capacity), it's clear that it's important to buy these products when they are available to us.

I suspected that products carrying the MSC logo would be hard to find, or prohibitively expensive for the average shopper, but a list of stores carrying MSC-labeled fish and fish products revealed a surprising number of sources. Whole Foods, Wild Oats, and Wegman's are all carrying these products, but also on the list are Walmart, and Safeway stores, among others. This is a great direction for these large corporations to take, because if sustainable products are readily available, and affordable, it seems to me like the average consumer would glady make the purchase. The challenge then lies in the hands of marketers and these organizations to educate the public.

Now, back to the halibut fillet sitting in my shopping cart. I had ripped out a recipe from this month's Bon Appetit , for Chipotle-Glazed Halibut, with Avocado-Tomatillo Sauce. I happen to adore tomatillos, and the recipe had very few ingredients, so it went to the front of my recipe basket. It was a cinch to put together - I made a quick glaze with chipotle chiles, honey, orange juice and spices, then made the Tomatillo Sauce in the blender using just tomatillos (I used canned), an avocado, and orange juice...and that was it! The recipe called for grilling the fish, but I just popped it in the oven at 400 degrees. I roasted some potatoes to go along with the fish, and garnished it with cilantro, and it plated up beautifully too, as you can see. Mostly importantly though, it was delicious. Extra points for sustainability as well.

Notes
The original recipe made 6 servings; I halved it with no problems. I also added some additional spices and some brown sugar to the glaze, because the honey that I had in the pantry was more savory than sweet. I used canned tomatillos because the store didn't have fresh, and I don't think it made much of a difference, but now I have to find a use for the rest of can...

The recipe is not yet posted on Epicurious , but they update it pretty regularly, so if you're not a subscriber, just check back in a few weeks.

The information about MSC in this entry was all gathered from their site, listed above.

Monday, June 19

Sweet Little Cakes

These past two weeks have been filled with errands and a seemingly endless list of chores. Leaving town for a month-long vacation isn't a hardship by any means, but it creates a small mountain of "catch-up" activities that prevent you for weeks from doing anything remotely similar to relaxing. This weekend we saw the valley on the other side of the mountain. Having finished the last of the laundry and other essentials, Dustin and I painted the bathroom, tended our neglected garden, and placed the last few windows in the greenhouse. Our chores were done, and we sat, after dinner, wondering if there was anything sweet we could whip up, as a reward for our hard work.

The answer was lying in my recipe basket, where it has been patiently waiting for the right moment to be tested. Dustin and I made it a team effort, and whipped up a batch of "Individual Strawberry Jam Cakes", from Martha Stewart. The cake was tender, but sturdy enough to hold that luscious little jammy surprise in the center. Our cakes were filled with raspberry jam, which was wonderful...the perfect handheld dessert. Much to Dustin's pleasure, the end result was akin to a jelly-filled doughnut, but better, in my opinion. We scraped every last bit of icing from the parchment placed to catch the drips, and poured every little drop right back on the top of those sweet little cakes.

Individual Strawberry-Jam Cakes
From Martha Stewart Living Magazine

1/2 cup (1 stick) unsalted butter, room temperature, plus more for greasing tin
3/4 cup granulated sugar
1 teaspoon finely grated orange zest (I didn't have oranges, but I'm sure this would be good)
2 large eggs, separated
1 1/2 cups all-purpose flour
1/2 teaspoon baking powder
1/4 teaspoon salt
1/4 cup milk (I used skim with no adverse effects)
6 tablespoons strawberry jam (or your favorite)
1 1/2 cups confectioner's sugar (I used more, to make the icing "stick" better)
1/4 cup freshly squeezed orange juice

Preheat your oven to 350 degrees. Butter a standard 6-cup muffin tin; set aside. In a medium bowl, beat butter, granulated sugar, and zest until light and fluffy. Beat in egg yolks one at a time until creamy; set aside. Into a small bowl, sift flour, baking powder and salt. Add flour mixture in alternating batches to butter mixture; set aside.

In a clean bowl, whisk egg whites to soft peaks; fold into batter. Divide half of batter among muffin cups. Make an indentation in the middle of each; fill with 1 tablespoon jam. Top with remaining batter.

Bake until a cake tester inserted in top cake layer comes out clean, about 30 minutes. Unmold cakes, and transfer them to a wire rack to cool. In a small bowl, whisk together confectioner's sugar and juice. Place rack over parchment paper; drizzle cakes with glaze.

Makes 6 small cakes

Notes from the Baker: These cakes were great right out of the oven, but I liked them best the second day, after the icing had hardened on top. I was surprised that they stayed moist and tender for days afterward. The texture reminds me of a poundcake, but without being heavy or greasy at all. I was conservative with the jam this time, for fear of it leaking out and making a mess, but next time I will try and increase the amount of jam filling in the middle, to ensure that each bite is filled with berry-goodness.

Friday, June 9

Catching Up


The present is always a good time to start on a new project, (as opposed to, say, sometime in the future), but I can't help but feel like I'm already behind, and I've barely just begun! Think of all the good opportunities I had in the past year to post about our trips to Montreal, Mexico, Asheville, or Chicago, and all of the great restaurants where we've dined! Or, what about my record-setting cookie baking marathon that I executed with unprecedented success this past Christmas? Think of the excitement and progress that I failed to capture! Oh well. The future looks just as promising in the way of travel and adventure, and I will surely spend just as much time in the kitchen this year, working my way through the massive collection of cookbooks that looms over me with equal parts seduction and intimidation. Oh well...what's past is past, and I'm always ready for the next adventure...in the kitchen, or otherwise.

A Glimpse of Italy


It seems unfair to mention a month-long Italian honeymoon and neglect to share some of the beautiful photos that document our adventure. Our trip started in Rome, the day after our gorgeous wedding in Chicago. From Rome, we rented a Fiat Punto, and drove 2,000 miles through central and northern Italy. We made stops in Florence, Sinio, Lago Orta, Venice, Bologna and Spoleto, and explored countless other small towns on the way. My hubby and I braved the Italian Autostrada and drove like true Italians- fast...and faster. How else could we see all that we did? We shared wonderful meals, always accompanied by a bottle of wine, and we met some wonderful characters - people who will continue to color our memories of this wonderful trip!


Time on my Hands


Now that my wedding has come and gone, and my massive binder of wedding ideas and planning has been shelved, I'm left to ponder, "What next"? A girl needs a project to keep her on her toes, and while I'm determined to continue the relaxed lifestyle my hubby and I got used to on our month long Italian honeymoon, I still need a little something to keep the juices flowing. How about a blog? My favorite way to spend my time is in the kitchen, wine in hand, and while this usually comes to a very satisfactory ending (food on the table, happy bellies), it's time to up the ante. I am nothing if not insanely organized, and I love to document things, so we'll call this the documentation of my self-governed culinary education.
Vermont Farm Table