Thursday, September 28

Moroccan Braised Chicken


I've become a huge fan of chicken legs lately. They aren't dry and
boring like some poultry cuts I know (ehem, chicken breast), they are
cheap enough to justify spending those dollars you save elsewhere
(like the wine aisle). They make for a handsome presentation, and
they work wonderfully in braises.

Braising is something I've been doing a lot lately; maybe because of
the change in seasons, or my new book on braising ,or maybe just
because it works so beautifully, and is so easy.

I tore this recipe out of Everyday Food, that
pint-sized magazine which the grande dame of domesticity publishes.
This is a magazine which I've been suspicious of in the past. The
recipes always appear to be too simplistic. I can appreciate cutting
a few corners for the sake of a quick weeknight meal, but microwaving
a beef stew? A pea soup recipe with 4 ingredients? I have my doubts
about these things.

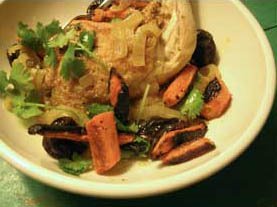
Despite my snobbery, I thought this recipe look promising - it was
short on ingredients, but you could tell it would be big on
flava'. The chicken legs were braised with onion, prunes, and
a trio of spices - tumeric, ginger and cinnamon. I took the liberty
of adding some cayenne, some honey, and some cilantro to the braising
mixture, and used chicken broth instead of water. The chicken is
served alongside roasted carrots, dressed in lemon, olive oil, salt
and fresh ground black pepper, and all this is set atop a bed of
couscous, to which I added olive oil, lemon juice, cilantro. If
you're one of those people who has a thing against fruit and meat
sharing a plate, then perhaps you could add some almonds, which would
have been a great idea anyways, but as it was, this was an
outstanding weeknight meal.

Moroccan Braised Chicken
Adapted from Martha Stewart's Everyday Food

For Chicken:
2 Chicken Legs, trimmed of excess fat
2 Tbsp olive oil
1/2 yellow or sweet onion, sliced to a medium thickness
Coarse Salt and Ground Pepper
1/4 tsp tumeric
1/4 tsp ground ginger
1/8 tsp ground cinnamon
Pinch of cayenne
10 pitted prunes
1-2 Tbsp honey
1/2 cup cilantro stems and leaves, washed well
1 1/2 - 2 cups chicken broth
Toasted sliced almonds, (optional)

For Carrots
1 bunch carrots, peeled and cut on the bias into large chunks
1-2 Tbsp olive oil (a good drizzle)
Course salt and fresh ground pepper
1/2 lemon

For Couscous
1 cup couscous
1 3/4 cups water
1/4 cup chopped cilantro leaves
1-2 Tbsp olive oil
Course salt and fresh ground pepper
1/2 lemon

Directions
Preheat your oven to 425 degrees. Toss the carrots with the olive
oil, a few squeezes of lemon, and season with salt and pepper. Place
the carrots on a rimmed baking sheet and place in the oven to roast
until cooked through and deeply browned, adjusting the heat if
necessary. This will take anywhere from 20 - 40 minutes depending on
your carrots. Keep an eye on them though - and turn the oven down if
they are browning too quickly. When the carrots are done, toss them
with additional lemon juice.

Heat the olive oil in a heavy skillet over medium to medium-high
heat. Season the chicken with salt and pepper and add to the hot pan
to brown both sides until they are crisp, and golden brown. Set the
chicken aside on a plate, and pour out all but enough oil and
drippings to keep the bottom of the pan coated with fat. Turn down
the heat and add the onions, seasoning with salt and pepper. Saute a
few minutes, then add the spices, stirring to coat, and release their
flavor. Place the chicken legs back in the pan, on top of the
onions, and add the broth, prunes, honey and cilantro. Bring to a
boil, then turn down the heat to low, cover, and simmer gently.

Meanwhile, make the couscous. Place the couscous, olive oil, lemon
juice, and cilantro together in a medium bowl. Season with salt and
pepper. Bring the water to a boil and pour over the couscous. Cover
with plastic wrap to steam.

The chicken is done when it's cooked through - 20 minutes or more,
depending on the thickness. To serve, place a mound of couscous in
the bottom of a bowl (you want something to catch those juices!),
place a chicken leg on each, and arrange the carrots, and prunes &
onions from the sauce around the chicken. (I discarded the cilantro
stems). Taste the sauce - if it's weak, turn up the heat on your
stove and reduce the sauce until thickend slightly. Pour the sauce
around the chicken, and garnish with additional cilantro leaves, or
almonds if desired.

Serves 2

Monday, September 25

A Cookie is Never Just a Cookie


Is it? With a tall glass of cool milk, it's a comforting end to a long day. It's the sweetness you crave at 3:00 in the afternoon, when it seems like an eternity since lunch. And if you're a baker, it's the perfect thing to help you satisfy your need to bake something without getting out too many pots and pans, or making a trip to the store.

Some people like them chewy, others crispy, some with nuts, some without. Or what about the addition of oats, shaved chocolate, dried cherries, or cocoa nibs? Some people don't give a gosh darn - they just want a hit of sugar, and don't mind how it's delivered. I like to say that I've never met a cookie I didn't like, but like most people, I do have my 'druthers'.

I almost never make the same chocolate chip cookie recipe twice - almost never. Usually I can't resist the idea of stumbling across another great cookie recipe, and I hope that somewhere along the way, I will learn so much about what makes a cookie turn out the way it does, that I can develop my own perfect cookie. But certain cookies require loyalty, like this one, or my mom's chocolate chocolate chip cookies, which are absurdly impossible to stop eating. More on these later.

My ideal cookie though is crispy on the edges, with an almost caramel-edge, and chewy in the middle. They have to be absolutely loaded with chocolate chips - no chip-free bites allowed. I don't want to find myself searching through the cookie bag, turning each over to see which one looks like it has recieved the greatest proportion of chips - I don't want my cookie to put me that position. Don't make me look desperate, cookie. Give me some toasty walnuts, and on occasion, some oats, dried fruits, or almond extract to spice things up, too. But for the most part, it all comes down to the chips and the consistency of the dough.

This cookie, however, was made for my loving hubby, who likes to end each and every day with something sweet, followed by a large glass of milk, which is always consumed in one amazing gulp, which is in turn followed by an immediate and mandatory horizontal position. This sweet tooth likes his cookies on the soft side, verging on underbaked. I left a few cookies in the oven longer though, so I could satisfy my craving as well.

Oatmeal Chocolate Chip Cookies
Adapted from this recipe, which was adapted from this one.

1 cup all-purpose flour
1 cup whole-wheat pastry flour flour
½ tsp baking soda
½ tsp salt
¾ cup unsalted butter, melted and slightly cooled
1 cup packed brown sugar
¼ cup granulated sugar
½ Tbsp vanilla extract
½ Tbsp hazelnut extract (or vanilla, if you don't have it)
1 egg
1 egg yolk
1 ½ cups best-quality semi-sweet chocolate chips
1 ½ cups rolled oats zizzed in a food processor for a few seconds

Preheat your oven to 325 degrees. Line 2 cookie sheets with parchment paper or silicone baking mats .

Sift together both flours, baking soda, and salt; set aside. In a medium bowl, cream together the melted butter and brown and granulated sugars until well blended. Beat in the vanilla, hazelnut, egg, and egg yolk, mixing until light and creamy. Mix in the sifted ingredients, and mix until well-blended. Using a wooden spoon or spatula, stir in the chocolate chips and oats by hand. Chill dough in the refrigerator for 30 minutes to one hour. Scoop and press dough into ¼-cup measuring scoops, and plunk the mounds onto the prepared cookie sheets. Give the cookies a few inches to spread out as they bake.

Bake cookies for 13 to 20 minutes, or until the edges are lightly browned. Be sure to check on your cookies around 13 minutes, because mine didn't take much longer than this. Cool on baking sheets for a few minutes before transferring to wire racks to cook completely.

Enjoy!

Saturday, September 23

Wild Rice and Friends

I first made this salad out of Food and Wine 3 years ago, and I have faithfully returned to it every 6 months or so since then. Probably because it uses some of my very favorite ingredients - wild rice, chickpeas, raisins, sliced almonds, and it introduced me to this wonderful curry-flavored dressing, sweetened with honey, and given a little kick by a generous pinch of cayenne.


I still remember the article this recipe came from too - it was about a couple that had moved to Texas to escape city life, and all the recipes in the article looked wonderful. There were two other grain salad recipes, that are still on my to-try list.

Wild rice is such a treat - it's chewy and light, with an earthy taste that is a perfect base for all sorts of wonderful additions - dried fruits, nuts and seeds, smoked meats, and flavorful dressings. This particular salad fits in beautifully at the fall table, with it's muted colors and warm flavors. The original recipe calls for ham, but offers sliced almonds as an alternative, which I always use, because the salad stays longer in the fridge that way, and I always have some sliced almonds laying around.


I had this salad for lunch all week long, which my Butternut Squash Soup, and they made quite a pair for the first chilly week of fall, here in North Carolina. This salad is open for all sorts of happy experimentation - cranberries, whole smoked almonds, or even some roasted shallots... really, you could do anything with it your little heart desires. The dressing is versatile and delicious, so ladies and gents, get out your apron and get busy.

Wild Rice Salad with Chickpeas and Almonds
Food and Wine, June 2003

1 ½ cups wild rice (10 ounces)
Kosher salt
2 ½ tablespoons fresh lemon juice
2 tablespoons red wine vinegar
2 tablespoons Dijon mustard
1 tablespoon honey
1 teaspoon curry powder
1 teaspoon ground cumin
Pinch of cayenne pepper
¼ cup extra-virgin olive oil
1 19-ounce can chickpeas, drained and rinsed (or 1 1/2 cups cooked chickpeas)
¼ lb. smoked ham, diced (optional)
1 large handful sliced almonds
4 small scallions, white and light green parts, thinly sliced
¼ cup golden raisins (I used currants this time around)
Freshly ground pepper
Hot sauce (Cholula - is there any other brand worth using?)

Fill a large saucepan three-quarters full of water and bring to a boil. Add the wild rice and 1 tablespoon of salt and simmer over moderate heat until the rice is tender and most of the grains have just split, 50 minutes. Drain and rinse the rice under cold water, then drain again.

Meanwhile, in a large bowl, whisk the lemon juice, vinegar, mustard, honey, curry powder, cumin and cayenne. Add the olive oil and whisk until combined. Toss in the chickpeas, ham, scallions, raisins and wild rice. Season the salad with salt, pepper and hot sauce, transfer to a bowl and serve.

Serves 6

Tuesday, September 19

Butternut Squash Soup with Apple Confit


Does that sound delicious, or what? This soup was so easy, and the apple confit pushed it from ho hum, to "oh yum". Okay, that was cheesy, but this soup was great, it was ridiculously simple, and there's very little else to say about it. Make it. You will be so happy you did!

Butternut Squash Soup with Apple Confit
From "Fields of Greens" by Annie Somerville

3 cups Light vegetable or chicken stock
1 Tbsp olive oil
1 Medium Yellow onion, thinly sliced (about 2 cups)
3 Tbsp Calvados (if you don't have Calvados, you could substitute white wine, but the flavor is wonderful, and you'll find a million other uses for it!)
4 lbs Butternut squash, peeled, seeded and cut into large cubes (about 6 cups)
1 Tbsp unsalted butter
2 McIntosh apples or other flavorful, not too tart apples, peeled, cored, and sliced (about 2 1/2 cups)
½ cup Apple Juice
½ cup Creme Fraiche, (I used Greek yogurt)

Heat the olive oil in a soup pot and add the onion, season with salt and pepper, and saute over medium heat until slightly caramelized, about 15 minutes, adding a little stock and scraping with a wooden spoon if they start to stick to the pan. Add 2 Tbsp of the Calvados, and cook for 1-2 minutes, until the pan is almost dry.

Add the squash cubes and about a teaspoon of salt to the onions. Add just enough stock to barely cover the squash (about 2 cups); the squash quickly breaks down and releases its own liquid as it cooks. Cover the pot and cook over medium heat for 20-30 minutes, until the squash is very soft.

Puree the soup in a blender or with a handheld immersion blender, and thin it with stock to reach the desired consistency. Return the soup to the stove and cook over low heat for 30 minutes to further develop the flavors.

While the soup is cooking, make the apple confit. Melt the butter in a medium-size saute pan and add the apples; saute over medium-high heat, stirring to coat them with the butter. When they're heated through, add the remaining Tbsp of Calvados and cook until the pan is almost dry. Add the apple juice, cover the pan, and cook over medium heat for 15-20 minutes, until soft; cook, uncovered, for 8-10 minutes to reduce the liquid. Mash the apples, making sure the confit retains some texture.

Stir half the confit into the soup, saving the rest to stir into each serving. Season the soup with salt and pepper to taste. Add a spoonful of apple confit and a swirl of creme fraiche to each serving.


Notes:
To make a wonderful meal, serve this soup with crusty sourdough bread, nutty, well-aged Gruyere cheese, and a salad of biter greens with toasted walnuts and walnut-oil vinaigrette.

Wednesday, September 13

Mole (Moh-lay) on My Mind

As I was contemplating how to approach this post today, I started wondering at the place that mole has in Mexican cooking. It seems interesting that a culture which produces such wonderfully simple food should come up with a sauce which is has a famously long list of ingredients. So, curiosity leading the way, I pulled out my trusty Food Lover's Companion, which gave the following definition of mole:

Mole [moh-lay] From the Nahuatl molli, meaning "concoction", mole is a rich, dark, reddish-brown sauce usually
served with poultry. There are many variations of this spicy Mexican specialty...mole is a smooth, cooked blend of onion, garlic, several varieties of chiles, ground seeds and a small amount of Mexican chocolate...


With some further investigation, I uncovered some debate as to whether or not the Aztecs (thought by many to have made the first mole) would have actually used chocolate, which they considered to be sacred, in such a sauce. Turns out scholarly types don't think so, so the mole we know today is most likely a complex sauce that has developed over time, but has the basis of onion, chiles, and spices, which are all very familiar Mexican ingredients.

I ate my first mole only a short time ago, and it has been one of those foods that grew on me while I wasn't looking. The first time I tried, I said "this is pretty good", but wasn't enamored. I tried it a few other times - still no love. Then suddenly, out of the blue, I was craving mole on a regular basis. I wanted to try and make it at home, but envisioned a long and frustrating day in the kitchen, where at the end, I might find myself wishing I'd just gone to my local burrito shop to fulfill my craving instead.


Lucky for me I have Sally Schneider's A New Way to Cook, which offers up a tasty "Revisionist Mole", which is quicker, easier, and healthier than most moles. This may not win any Mexican cookoffs, but it sure makes for a tasty addition to your weekday meal repetoire. This recipe made enough for me to freeze 4 extra servings, which I've used for the burritos I show below, and some outstanding "Fat Bean Tacos", which we topped with sliced radishes, chopped avocado and some fresh cheese. My plans for the remaining sauce in the freezer include a Mole Pork Tenderloin, and another round of bean tacos, which were totally delicious.

Revisionist Mole

6 Dried Ancho chiles
5 Garlic cloves, Unpeeled
1 tsp ground cinnamon
¼ tsp dried basil
¼ tsp dried oregano
¼ tsp cumin seeds
1 ½ cups chicken broth
1 Tbsp balsamic vinegar
1 ½ tsp vegetable oil
2 medium onions, chopped medium fine
1 28 ounce can crushed tomatoes or whole plum tomatoes, (pureed in a blender with their juices, if using fresh)
1 ounce chunk smoked ham, cut into 4 pieces
¾ ounce Mexican chocolate, (or 1 Tbsp unsweetened cocoa powder)
1 - 2 tsp sugar
Kosher salt

With scissors, split open the chiles, and sicard the stems and seeds. Cut the chiles into large flat pieces. In a large heavy skillet, toast the chile strips over moderate heat, turning occasionally to prevent burning, until they begin to darken and smell pungent, about 3 minutes. Transfer to a medium bowl. Cover with about 2 cups boiling water and let soak for 20 minutes, or until soft.

Meanwhile, add the garlic cloves to the skillet and toast for about 15 minutes, turning occasionally, until the skins have blackened in spots and the garlic has softened somewhat. Remove from the heat.

In a blender, combine the garlic, cinnamon, basil, oregano, cumin seeds, chicken broth and vinegar. Drain the ancho chiles and add to the mixture. Blend at high speed for one minute, until smooth.

In a large skillet, combine the oil and onions, cover and cook over low heat until the onions have begun to release some of their liquid, about 5 minutes. Uncover, increase the heat to moderate, and saute the onions until golden brown, about 10 - 15 minutes.

Add the ancho chile mixture and cook, stirring, for 5 minutes. Stir in the tomatoes and ham, partially cover, and simmer until the sauce is very thick, about 25 minutes.

Add the chocolate and simmer until the sauce is very thick and has reduced to about 4 cups, about 10 minutes longer. Discard the ham (which will have given up its flavor) and add the sugar and salt to taste.

The sauce can be refrigerated, covered, for up to 1 week or frozen up to 3 months.


Notes:
This is an easier take on mole, and much less fattening. You can use it to season bean soups, doctor up canned beans, or braise pot roast and chicken. Use it in Fat Beans with Mole (from the book). Toss it with shredded leftover pork or chicken or with shrimp and roll up in hot tortillas. You can also make a marvelous chili by stewing 2 pounds of 1/2 inch chunks of trimmed stewing beef or venison in the sauce until it is very tender, about 1 1/2 hours over low heat. Brown the meat in 2 tsp rendered bacon fat or oil first. Add dark beer, 1/4 cup at a time, to the sauce to replenish the level as it cooks.

Sunday, September 10

A Little Sunday Night Comfort


If you love to cook, Sundays are the most anticipated day of the week. A full day to prep, season, and saute away! I love to plan for the week on Sundays, sometimes preparing soups to eat for the week, or just cleaning out the fridge and making the kitchen sparkle, so that when I get home from work, it's a pleasure to spend time in the kitchen preparing dinner.

As much as I love to cook on Sundays, I also don't like to be stuck in the kitchen all day long, so our Sunday night meals are usually something simple and comforting, something to help us finish off the week in a good state of mind, preferrably something that goes well with some red wine (there aren't many things that don't go well with red wine if you're a dedicated daily indulger).

I have had Donna Hay's Book, Off the Shelf: Cooking From the Pantry for about 6 years now, and never had I made one thing from it until tonight. Why? I really couldn't say, because I've flipped through it a million times, the photos are so enticing, and everything is dead simple. When I pondered what to do with my leftover ricotta (why is there always this dilemma of leftover ricotta? I actually like it enough to eat off a spoon, but usually try to refrain from doing so), I decided to finally give old Donna a try. This Ricotta Spinach was simple and pretty satisfying, but I altered the recipe quite a bit, and found that I needed the full amount of pasta called for in the recipe, but only half the ricotta spinach topping, which caused me to have to go back and boil another pot of water for pasta, since it was obvious that I had WAY too much topping for half a box of pasta, even though I had halved the recipe for it.

This is a great base recipe, and uses some ingredients that I'm usually looking to use up after days of sitting in the fridge with no purpose ahead of them. I will certainly use this as a basis for future baked pasta dishes, but I will probably never make it exactly the same. I think a layer of roasted cherry tomatoes would have done wonders for the overall impact of the dish, visually and because it would provide an extra layer of texture and brightness that was missing here. As for Donna's book, I'm not sure I could make a judgement just yet... I'll have to do some more testing and report back.

Ricotta Spinach Pasta Bake
Based loosely on a Donna Hay recipe

5 fl. oz sour cream
3/4 lb ricotta cheese
2 eggs, beaten
1/2 cup parmesan or pecorino romano cheese, grated
1 bunch Spinach, stemmed and washed thoroughly
1 clove garlic, minced fine, and smashed to a paste with your knife
1 handful Italian parsley, chopped
1 handful basil leaves, chopped
Pinch of red pepper flakes
Pinch of nutmeg
Salt and Pepper
1 pound penne or rigatoni

Preheat the oven to 350 degrees. Put a large pot of water on to boil ( you will use this for blanching the spinach and cooking the pasta. Prepare a oven safe baking dish, about the size of a large pie dish, or deep casserole; whatever you choose, just keep in mind that thick you want your layer of noodles - probably about 3 inches or so.

In a medium bowl, combine the sour cream, ricotta, eggs and parmesan cheese. Season with a pinch of nutmeg, red pepper flakes, salt and pepper, and set aside.

When the water reaches a boil, blanch your spinach and remove to a colandar to drain and cool. Bring the water to a boil again and cook the pasta to al dente. When the spinach is cool enough to handle, squeeze well to drain, and move to your cutting board to chop. Add the spinach, garlic, parsley, and basil to the ricotta mixture and stir to combine.

When the pasta is finished, toss with a little olive oil and place in your baking dish, pressing the noodles into the dish to remove air pockets. Spoon the ricotta mixture over top the noodles and smooth the top.

Bake for 35 minutes, or until the top is golden brown, and the top is set. If necessary, turn up the oven at the end to achieve a more golden crust.

Serves 6

Sunday, September 3

Inspiration for a New Season

I adore fall, and the change that it brings. The cooler air seems to bring with it a sense of renewal that I find more intense than the spring. After a long, hot summer, I cannot wait to pull out my sweaters, trade my iced coffees for warm lattes, and to treat myself to all the wonderful foods of fall. Warm stews and soups, roasted squash and parsnips, pies and delicious warm breakfasts of oatmeal are all the ultimate comfort foods to me. I feel inspired and reflective in the fall. The slower pace and softer light offer a beautiful new perspective.


We were lucky enough to get a little cooler weather right in time for the beginning of September, and although I know we have more hot weather ahead of us here in the South, my mind and body are already set in the new season, and so I've begun cruising through my cookbooks and magazines, looking for my inspiration for these next few months in the kitchen. I pulled out this recipe from Gourmet last month, and the soup is a perfect transition from summer to fall. It uses the last of the tomatoes reddened in the summer sun, or, if you're like me and you already exhausted your supply, go ahead and use canned tomatoes. I can guarantee the results are just as tasty.

This soup is satisfying without being heavy. With a salad or a slice of bread, it would make a great lunch or light dinner.

Provencal Tomato Soup with Rice

2 lb tomatoes (or substitute 1 28-oz, and 1 14-oz can of whole, peeled tomatoes, de-seeded as instructed below)
2 medium onions, halved lengthwise, then thinly sliced crosswise (2 cups)
1 medium carrot, coarsely grated
1 celery rib, finely chopped
4 large garlic cloves, finely chopped
3 (3- by 1-inch) strips fresh orange zest, finely chopped
1 teaspoon finely chopped fresh thyme
Scant 1/4 teaspoon dried hot red-pepper flakes
1/4 teaspoon fennel seeds
1 Turkish bay leaf or 1/4 California
3 tablespoons extra-virgin olive oil
2 tablespoons tomato paste
3 cups water
1 3/4 cups reduced-sodium chicken broth (14 fl oz)
3/4 teaspoon salt
1/4 teaspoon black pepper
Pinch crumbled saffron threads
1 to 2 teaspoons sugar
1/4 cup long-grain white rice
2 tablespoons chopped fresh flat-leaf parsley
1/4 cup chopped fresh basil


Cut a shallow X in bottom of each tomato with a sharp paring knife. Blanch tomatoes in batches of 2 or 3 in a 5- to 6-quart pot of boiling water 10 seconds, transferring with a slotted spoon to a bowl of ice and cold water to stop cooking.

Peel tomatoes, then halve crosswise. Squeeze halves gently, cut sides down, over a sieve set over a bowl to extract seeds and juices, then press on seeds and discard them. Reserve juice and tomatoes.

Cook onions, carrot, celery, garlic, zest, thyme, red-pepper flakes, fennel seeds, and bay leaf in oil in a 2 1/2- to 3-quart heavy saucepan over moderate heat, stirring occasionally, until vegetables are softened, about 5 minutes.

Add tomatoes with reserved juice, tomato paste, water, chicken broth, salt, pepper, saffron, and 1 teaspoon sugar, then simmer, uncovered, stirring and breaking up tomatoes with a spoon occasionally, 20 minutes. Stir in rice and simmer, uncovered, until rice is tender, 10 to 20 minutes. Discard bay leaf and stir in parsley, basil, and sugar and salt to taste.

Makes 4 to 6 servings.

Friday, September 1

A Muffin with Character


It's crunchy with millet and cornmeal, it's scented with orange, and it's full of chewy dried cranberries. Muffin, I think I love you.

This recipe is from my favorite cookbook In The Sweet Kitchen. I highly suggest toasting the muffins in the oven if you can't get to them warm out of the oven.

Orange, Dried Cranberry and Cornmeal Muffins with Millet

(Author's Note: I probably make this recipe, exactly as it is here, more often than any other. These muffins became a hit several years ago when my duties as pastry chef at Avalon included baking breakfast pastries for the sister restaurant, Zocalo. After weeks of the entire batch of these disappearing into the hands of the cooks and wait staff before the customers even got to them, the chef insisted everyone eat breakfast at home! They are a great combination of flavors and textures. Cornmeal adds a nutty, toasted flavor; plumped dried cranberries give the muffins a chewy, pleasantly tangy taste; millet adds a subtle sweetness and crunch; and freshly grated orange zest and orange juice lace it all together with a fresh, bright taste. As far as I’m concerned, the perfect muffin!

2 2/3 cups all-purpose flour (I used half whole-wheat pastry flour)
4 teaspoons baking powder
1 teaspoon salt
1/2 cup granulated sugar
2/3 cups yellow cornmeal, preferably stone-ground
1/4 cup millet
2 large eggs
1 teaspoon finely grated orange zest
1 1/2 cups orange juice
2/3 cup unsalted butter, melted and cooled
1 cup dried cranberries, plumped in warm water for 30 minutes if necessary

Preheat the oven to 350 degrees F. Grease 6 large (1-cup) or 12 regular-sized (1/2 cup) muffin tins, including rims, or line with paper liners. I find a non-stick cooking spray works very well. Sift the flour, baking powder and salt together into a large bowl. Add the sugar, cornmeal and millet and stir together with a fork or whisk to blend.

In a separate bowl, lightly whisk the eggs, then blend in the orange zest and juice and melted butter. Add the egg mixture all at once to the dry ingredients, mixing with a rubber spatula or a wooden spoon just until the dry ingredients are moistened. While there are still a few floury patches, gently fold in the cranberries.

Spoon the batter into prepared tins, filling each cup to the rim, and place the try on a baking sheet, to catch any drips. Bake 20 to 25 minutes for regular-sized muffins, 30 to 35 minutes for large ones, or until the tops are golden brown in places, spring back when lightly touched and a skewer inserted in the center comes out clean.

Transfer the tray to a rack and cool 5 minutes, then turn the muffins out onto the rack. These are fabulous served warm with a little sweet butter, or may be cooled completely, then wrapped individually and stored at room temperature for up to two days. If they become slightly hard, wrap in foil and warm in a low oven before serving. These muffins also freeze beautifully, for up to 2 months.

Source: In the Sweet Kitchen, Regan Daley
Makes: 6 large or 12 regular muffins

Vermont Farm Table